
| Free articles and cheat sheets from Digital Camera World (Tech Radar): Best camera settings for sunsets (free photography cheat sheet) How to predict the angle of sunrise for the perfect landscape photography How to capture a silhouetted sunset Sunset photography: how to balance exposures and get accurate colours Color temperature scale (see also graphic at the bottom of this page) |
“In the beginning, God created the heaven and the earth. And the earth was without form and void; and the darkness was great upon it. And God said, Let there be light, and there was light. And God saw the light, that it was good.”
One thing I will emphasize over and over again is that without light, photography is not possible. When we discuss films later on, you will know that it is the action of light upon the silver halide compound that produces the image. Light really is good!
Always consider the quality of light
The main source of light for photography is the sun and as the sun moves across the sky, the quality of light changes. If you want to be a good photographer, you should always consider the quality of light.
(The sun doesn’t really move across the sky, as you will remember from your basic science. It’s just how things appear to us, okay? If I remember my college philosophy class correctly, the term is “phenomenological.”)
Avoid shooting at noontime


Avoid shooting, as much as possible at noontime; the harsh sun will create deep, ugly shadows underneath people’s eyes, like in the pictures above.

If both you and your subject are in the shade, then it’s okay to shoot. But avoid situations like in the picture above where the leaves of the trees create uneven, scattered areas of light and shadows. Some Filipino photographers call this the “chocolate effect.”
The golden hours
Photographers call both sunrise and sunset as the “golden hours” because these times provide a gorgeous light that’s very suitable for photography. At dawn, the light is dominated by soft pinks while at sunset, the colors become more golden. (See the color temperature graphic at the bottom of this page.)

With the picture above, I first noticed the “golden light of the dying sun.” Okay, okay, I know such descriptions are absolutely corny, but hey, girls just love this corny stuff! I got my beloved Canon AE-1 Program camera fitted with a 50 mm, f/1.8 lens and loaded with Kodak Gold 100. I asked my cute nephew JR (who looks like me) to stand in that spot. I wasn’t satisfied however with the set-up, and when I looked around, I saw my rocking chair. I got the chair, asked JR to sit on it, and he just naturally struck that great pose. JR really takes after me! I love that golden light, the deep black shadows, JR’s shadow on the rocking chair, the chair’s shadow on the wall ... I just love photography!

 With black and white photography, of course, we don’t talk about colors of sunrise and sunset. At these times, what you should look out for as your subject are dramatic, long shadows created by the sun’s position, like in the pictures above.
The direction of light
 |
| Free infographic from Digital Camera World / Tech Radar (click the image to see a larger-sized image) |
Train yourself to notice and to use aesthetically the direction of your light source. Look at the picture below for example; by the way that student’s face is illuminated and the long shadows behind him, you can guess (quite correctly) that the light comes from the late afternoon sun.
 There are primarily three ways by which a subject can be lighted: from the front, the side or the back.
1. Front lighting - your light source which may either be the sun or artificial light sources like your camera flash, comes from directly behind you. Front lighting gives you great colors and a lot of subject detail. On the minus side, these details are flat. Since your light source directly illuminates your subject, the shadows created are placed behind the subject. Your picture will be two-dimensional, lacking depth. (Remember our discussion of perspective and depth?)
By the way, speaking of shadows, W. Henry Fox Talbot, considered as the father of photography, defined photography as “the art of fixing a shadow.” We will discuss shadows (“cast” and “contained”) as a photographic subject later on.
A common source of front lighting is your camera flash. We will discuss later how to use your flash and the common problems in using it.
2. Sidelighting - this kind of lighting produces the strongest three-dimensional effects. In our discussion later on, you will learn that sidelighting is one good way of creating the illusion of depth in your pictures. Soft sidelighting, however, is best for portraits and landscapes.
 With portraits, avoid having half of the face in deep shadow with no details, and with the other half in strong highlight. Unless, of course, if you’re striving to create a highly dramatic effect. It’s usually better to have some details in the shadow side of the face, like in the picture above of a very pretty Girl Scout. (Professional photographers on this topic talk about the “split ratio” between highlights and shadows, but that’s too technical for us.)
3. Backlighting - generally, you should avoid shooting against your light source since this creates high contrast and greatly reduces details in your subject. The technical term for shooting against the light is “contra luz.” In French, it’s called “contre jour.” If you’re shooting portraits, for example, your background will turn out bright, while your subject’s face will turn out in deep shadows. That’s because your camera’s light meter will be fooled by all that background brightness.
Several ways of counteracting this problem are:
(1) to use white or silver colored boards to reflect some light back to your subject; and
(2) to use your camera flash to throw some light into your subject.
 In the example at the left, I wanted to take the picture of the bride and groom as they were walking away from the altar. Problem was, I was shooting against a very bright video light. Using the flash of my borrowed digital camera, I was able to get some details in the faces of the bride and groom. The picture came out a good shot, capturing the drama, emotions and excitement of a wedding. (Hey, if you don’t believe me that this is a good picture, I won’t treat you out to pizza! For those of you who think this is a good picture, e-mail me and then we’ll have pizza!)
Photography books and magazines will tell you about how to use “fill flash” and “fill flash ratios” but these topics are a little bit complicated at this point in our series. Anyway, most modern cameras will automatically choose the correct setting for your flash even in difficult lighting situations.
If you have no choice but to shoot your subject however, you have to choose which is more important - the highlights or the shadows. If you choose to play up the background, you will be creating a silhouette. More on silhouettes later, I promise.
Be careful when you are shooting directly at the sun
You could seriously injure your eyes when shooting directly at the sun, as what happened to famous astronomer Galileo Galilei. He destroyed his right eye from constantly looking at the sun through his telescope. What you should do in this situation are:
(a) place a piece of paper between your eyes and the camera’s viewfinder to soften the light striking your eye;
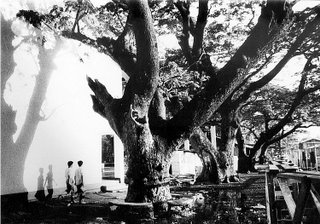
(b) place the sun to the side, and if possible, hide it behind objects like leaves or branches, as in the picture below.

 The camera flash as a light source
The camera flash is one of the most useful accessories for any camera system, whether an SLR or a compact 35 mm compact, digital or film-based. In a lot of situations, you’ll only be able to shoot if you have a flash on your camera. But a flash often creates harsh shadows and flat lighting that often destroys the mood of a picture. (In some instances, like theater presentations, you may not be allowed to shoot pictures as this will destroy the lighting set-up.)
Thus, photographers often use “available light” (a.k.a. “existing light” or “ambient light”). This means using film with a high ISO rating, slow shutter speeds and wide apertures, and sometimes placing the camera on a tripod.
Speaking of flash … Sebastião Salgado is considered as the best ever photojournalist in the world. Born into an affluent Brazilian family, he took graduate studies in economics in France. Yet, his pictures have always been of struggling workers, the powerless and the dispossessed. He didn’t have any interest in photography until his wife, Leila, an architect, gave him a camera as a gift. The very first time he looked through the viewfinder, he was hooked on photography. Know what? Salgado doesn’t use flash when shooting his pictures, relying only on available light.
That does it! First thing tomorrow morning, I’m going to throw away my flash!
Relevant discussion on color temperature and color wheel: Photojournalism (8): Color or black and white?
 |
| Color temperature scale (free cheat sheet from Digital Camera World / Tech Radar) |


No comments:
Post a Comment