
 Without light, photography is not possible
Remember what the poet Francis Bourdillon said? “The night has a thousand eyes and the day but one. Yet the light of the whole world dies when the day is done.” I don’t know if Bourdillon ever tried photography, but these lines underscore our heavy reliance on the sun, on sunlight, in order for us to take pictures. Remember that without light, photography is not possible. There are instances, however, when we have to use artificial light sources in order to take pictures, like when we’re shooting indoors, in overcast sky, early morning, late afternoon, evening ...
 |
Free PDF resources on fill flash Flash Part 2: Fill Flash by Stephenson and Whittle Sony lighting guide (fill flash discussion on p. 10) Fill Flash by Mark Greenland Daylight Fill in Flash by Rick Sammon Fill Flash cheat sheet |
The most common form of artificial lighting for photography (whether digital or film-based) is electronic flash. An electronic flash has a glass tube filled with a rare gas called Xenon (atomic number 54, atomic weight 131.30; the sole source is the atmosphere which constitutes 1 part in 20 million). The flash is powered by a battery-fed capacitor. When you switch your flash on, you’ll hear the high pitched sound of the capacitor turning battery power into AC (alternating current).
After storing energy, the capacitor releases it to the tube to create the flash of light whose duration is often faster than 1/1000 of a second. This is actually your effective shutter speed. We will study shutter speeds later on; for now, if you’re using a manual SLR camera, you have to set your shutter speed dial to your “x-synch” which may be 1/60, 1/90/ 1/125 or 1/250 sec. The “x-synch” is the speed you have to set when using your flash. This speed is sometimes marked on your shutter speed dial by a lightning bolt symbol. In some camera models, this number (a fraction actually) is marked by a different color.
If you’re using an automatic, point and shoot camera (whether digital or film-based), you don’t have anything to worry about. The camera will do everything for you, except buy pizza for you …
Problems when using flash
 1. Harsh shadows
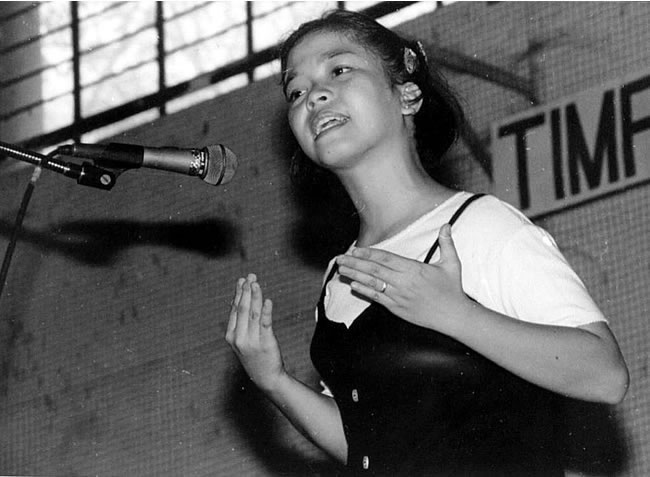
Perhaps the most negative aspect of using flash is the harsh shadows created behind your subjects, like in picture above where the shadows of Gracie (my student in Rizal High School in the 1990’s) and the microphone are clearly visible on the background. These shadows oftentimes destroy the mood of a picture.
Solutions? One, you can choose a different viewpoint like what I did in the 2nd picture above. By moving to the left, I got a darker toned background that absorbed the shadows. Two, you can adopt a high point of view. In this situation, the shadows will be hidden behind your subject. Three, if you can afford it, buy a ring flash; this flash creates no shadows.
2. Foreground object casts shadows on the subject
 This is the classic booboo when using flash. A foreground object (in the picture above, the student on the left hand side) receives too much light, and casts shadows on the main subject, the guys in the background. Solution? Fill the frame with your subject and choose your viewpoint carefully.
3. Automatic flash can be fooled or thrown off by the overall brightness of the scene
 When your subject has light toned surroundings or elements, like in the picture above where the shy student says “Hello!” from behind some graduation togas, your automatic flash can be fooled or thrown off by the overall brightness of the scene. The result? Your subject comes out underexposed or too dark, while the surroundings turn out properly exposed. Solution? Set your flash on manual, measure the distance between you and the subject, and then set the appropriate aperture.
4. Flash fall-off

When subjects are located at different distances from the camera, they won’t receive the same amount of illumination from your flash. In the picture above, the girl on the extreme right (Miss Rizal High 1992), in the foreground, gets the right amount of light. The girl on the extreme left (Miss Freshman 1992), on the left hand side, is farthest from the camera, so she receives a lesser amount of light and thus her image turns out darker. The technical reason for flash fall off is the so-called “inverse square law” but hey, I don’t want to bore you with another math-related topic! Just make sure your subjects are located at the same distance from the camera by choosing the right viewpoint, okay?
 5. Hot spots
When your subject’s background or any element in the subject is a reflective, polished surface like mirrors, glass doors, chrome finished exteriors, etc. your flash will create harsh reflections known as hot spots, like in the picture above of the student playing the role of the Tin Man from “Alice in Wonderland.” One solution can be to choose the right viewpoint so as to possibly minimize the size of the hot spot. While generally regarded as liabilities, hot spots however may be used creatively.
 In the pictures above, the hot spots are in my student’s eyeglasses. In the right hand picture, I got a better portrait without the eyeglasses and without the hot spots. (Remember our lesson in shooting portraits? When shooting your subject’s face with one or both of her hands included in the picture, don’t show the back of the hand. Position the hand so that only the side is shown, as in the right hand picture above shows. This creates a slimmer line, unlike when the back of the hand is shown.)
6. The problem of red eye
“Red eye” occurs when the flash is located too near the lens. Red circular spots are created in the pupils of your subject’s eyes. Most 35 mm compact cameras (whether digital or film-based) have flash that’s designed to reduce red eye. If your camera flash doesn’t have this red-eye reduction feature, ask your subject to look closely at lamps or light bulbs before you take the shots. Also, you can use pentel pens to “retouch” your pictures or erase the red eyes. As you can see by now, red eye isn’t a problem if you’re using black and white film (please refer to our previous lesson on shooting color or black and white).
7. Creating a gentler, kinder light
You can create a kinder, gentler light falling on your subject by bouncing the flash off a low, gray or white colored ceiling. Or you can do it the way professionals do it. You can attach a white index card to your flash, fold it and bounce your flash off that card. If you’re using a manual flash, you have to open up your lens by one or two stops (more on this topic later on, okay?). If you’re using an automatic or dedicated flash, there’s no need to adjust your aperture.
Never use a shutter speed faster than your x-synch
| DSLR cameras have “high speed synch” that allows the use of flash at any shutter speed. |
The burst of light produced by the flash is similar in color with daylight. Electronic flash is “balanced” to give the same quality of light as the average noon daylight which measures about 5400 Kelvins in the color temperature scale.
Setting up a hot shoe mounted flash
Besides the built-in flash, the flash unit you’re probably most familiar with is the one where you have to place it on top of the camera’s pentaprism, inserting it into what is known as the hot shoe, and depending on the model, locking it into place. The picture above of my beloved Canon AE-1 camera shows this kind of a flash unit.
1. Install the batteries, observing the correct positive/negative placements. Batteries may either be conventional batteries or rechargeable nickel-cadmium (Nicad) batteries. You can save money using Nicads but take care charging these batteries. You’ll notice that flash with ordinary batteries take longer to recycle as the batteries lose their power; Nicads always have a constant recycling time, up to the time they totally lose power.Manual flash exposure
2. Switch the flash unit on; if the batteries are installed properly, you’ll hear a high pitched sound created by the oscillator turning DC power to AC. The sound is cut off when the ready light goes on. To be sure that the flash is working properly, press the test button.
3. If you haven’t done so yet, slide the flash unit into your camera’s flash accessory shoe (“hot shoe”). Some units have a lock on screw which prevents the flash from falling off. Depending on the model, the flash has one or more contact points which connect to the camera’s flash circuitry. Other flash units need to be connected through a cord to the camera’s PC or co-axial socket.
We will be talking about exposure or setting the correct shutter speed and lens opening combination in detail later on, okay?
1. The flash unit has an ISO scale; set it according to the film’s ISO rating (unless of course, if you’re pushing or pulling your film). Set your shutter speed dial to the x-synch.
With the advent of digital photography, most amateur photographers no longer have to learn or deal with ISO ratings. ISO stands for International Standards Organization and films are classified as ISO 100, 200 or 400 and so on. The higher the ISO rating, the more sensitive it is to light. ISO 100 film is the ordinary kind of film that’s given to you at the store if you don’t specify what kind of film you want. Before I started using a borrowed digital camera, I preferred using Kodak Max (an ISO 400 film).
With digital cameras, you can also adjust the camera to an ISO 400 rating. This means that you can take pictures even in low light situations even without using your flash. The downside however (I stand to be corrected on this, okay?) is that each picture will take up more memory and you will have lesser number of shots available.
2. Focus on your subject, and then read the distance between you and the subject as indicated on the distance scale of the lens. The scale is calibrated both for meters and feet; use whatever measuring system you’re most comfortable with.
3. On the flash unit’s exposure calculator, locate the flash to subject distance which you determined in Step 2. Opposite or below that number is the correct f/stop or lens opening to use. Set the aperture ring of your lens to this f-stop. Notice that on the exposure calculator, as the subject becomes progressively farther away from the camera, the larger the aperture or lens opening becomes. We will learn more about f/stops or lens openings later on, okay?
 Using the guide number to determine what lens opening to use
Instead of using the exposure calculator of the flash, you can also determine which f-stop to use through the flash unit’s guide number. The guide number is a measurement either in feet or meters of the flash unit’s power, as provided by the flash manufacturer. There is a different guide number for each film speed but generally, guide numbers are provided for ISO 100 film.
How do you know what’s the GN for your flash? Look for it in the instruction guide, or simply set your flash to ISO 100. Multiply any distance with the corresponding aperture and you’ll get the guide number. Remember that the higher the guide number, the more powerful the flash is (the more expensive the flash unit is too). The classic Vivitar 283 flash, a favorite among professional photographers even today, has a guide number of 120 feet.
How do you use the guide number? Divide the flash-to-subject distance into the GN and the result is the correct f-stop to use. For example, with a guide number of 16, the correct f-stop to use is f/8 if the flash-to-subject distance is 2 meters. Why? 16 divided by 2 equals 8, right? I knew that! Hey, I checked my calculator, and it gives the same result!
Automatic flash
With manual flash units, you have to change the aperture setting on the lens every time the flash-to-subject distance changes. Automatic flash units (whether for digital or film-based cameras) however, adjust the power or the duration of the flash to suit whatever this distance may be. They have a sensor on their front portion that measures the amount of light falling on the subject, and controls the duration of the flash depending on how close or how far the subject is. The sensor switches off the flash when the right amount of light has covered the subject. (Further on in this article, we will discuss problems in using automatic flash with light-toned surroundings.)
Dedicated flash
Dedicated flash units are designed to work exclusively for one specific camera model or models in a series. Through the contact points in the bottom of the flash unit, they automate a lot of flash functions like setting the ISO rating on the flash, and the camera shutter to the flash synchronization speed. They also give a flash-ready signal in the viewfinder so you won’t have to turn your eyes away from the camera in order to look at the flash unit. While the dedicated flash is recycling, it turns the camera back to available light measurement.
The most sophisticated dedicated flash units are capable of OTF (off the film) metering, that is, they measure the light hitting the film during exposure. This system makes flash photography simpler and almost foolproof. These flash units can also take into account the ambient light (“existing light”) for hassle-free fill flash photography. (All these years shooting pictures, I never could understand fill-flash ratios!)
Salgado (world's best photojournalist) and flash
Sebastiaŏ Salgado is considered as the best photojournalist in the world today. He comes from an affluent Brazilian family and has taken up graduate studies in economics in France. Yet, his pictures have always been of struggling workers, the powerless and the dispossessed. He didn’t have any interest in photography until his wife, an architect, gave him a camera as a gift. The very first time he looked through the viewfinder, he was hooked on photography. Know what? Salgado doesn’t use flash when shooting his pictures, relying only on available light. That does it! First thing tomorrow, I’m going to throw away my flash!


