
What is the basic nature of photography as a medium of artistic expression? In 1839, when William Henry Fox Talbot presented the process of photography to the Royal Society in London, he described the image he produced as having been “copied from nature,” that is, it looked exactly like the way it was in real life. Basically that’s what photography is all about – recording in film or in memory sticks (if you’re into digital photography) what exists out there in the empirical world.
Perhaps, this is the reason why some painters and sculptors look down on photographers. But as you may know by now, good photographs are not just record shots of what exists out there. Photography is definitely not an art form secondary to painting and other visual arts, and we should not feel inferior to those who draw or paint. Photographers are artists in the fullest sense of the word. As the title for an André Kertész biography puts it, photographers are “poets with a camera.” As Jacques Lipchitz said, “Copy nature and you infringe on the work of our Lord. Interpret nature and you are an artist.” Or as Georges Braque stated, “Great art picks up where nature ends.”
(While we’re in the quotation-citing mode, here’s my favorite quotation I made up myself: “Pizza is the best thing to ever happen in human history.”)
What “exposure” means
The term “exposure” means allowing the light to reach or strike the film inside your camera. With single lens reflex (SLR) cameras, exposure involves the following mechanical procedures: you depress the shutter release button; the lens opens to whatever aperture you have set; the mirror flips up out of the way; the focal plane shutter curtains open and close according to the shutter speed you have set; the mirror returns to its original position; and the lens is fully open again.
The proper exposure is achieved by the correct combination of shutter speed and lens aperture. The shutter speed controls the duration of the exposure, and the aperture controls the brightness of the image. The shutter speed and the aperture must always work hand in hand. The correct or proper exposure isn’t however a single shutter speed/aperture combination. For example, if the proper exposure for a particular scene or subject is 1/250 sec at f/11, you can achieve the same result by using the combination of 1/125 sec at f/16.
For a more detailed discussion, please refer to the Wikipedia article on “exposure.”
Here are the general rules on exposure:
(1) Bright lighting conditions - use a fast shutter speed and a small aperture;
(2) Dim lighting conditions - use a slow shutter speed and a wide aperture;
(3) The slower the shutter speed, the smaller the aperture should be;
(4) The higher the shutter speed, the bigger the aperture.
The Sunny 16 Rule
You’re shooting a subject that is lighted frontally by direct sunlight; in simpler terms, your subject is facing the sun. What’s the correct shutter speed and lens opening? Simply follow the Sunny 16 rule expressed in the formula - 1/ISO at f/16. Here are the steps:
(1) Set your aperture ring to f/16;Overexposure and underexposure
(2) Set your shutter speed dial to whatever speed is closest to your film’s ISO rating; for example, if your film is ISO 100, set your speed at either 1/125 sec or 1/90 sec; if your film is ISO 400, set your speed at 1/500 sec.
(4) Shoot your picture. That’s it. Piece of cake! (or should I say, piece of pizza!)
When you hang around professional photographers or serious hobbyists, you will very often hear them talk about “overexposed” and “underexposed” shots.
(1) A picture is “underexposed” when you use either too fast a shutter speed or too small an aperture. The result is a picture that is too dark, loss of details in the shadow areas and grayish highlights.
(2) A picture is “overexposed” when you use a shutter speed that’s too slow or an aperture that’s too big.
The term “stop” refers to either the aperture or the shutter speed. When you set your lens to an aperture between f/11 and f/16 for example, that’s a half-stop. The phrase “stopping the lens down” simply means setting your lens to the smallest aperture or opening possible under the prevailing lighting conditions.
Errors in setting the shutter speed or aperture could lead either to overexposure or underexposure. “Underexposure” is produced either by too fast a shutter speed or, and results in a picture that is too dark, with loss of detail in the shadows and gray instead of white highlights. “Overexposure” on the other hand, may be produced either by a shutter speed that’s too slow or by an aperture that’s too big. Overexposed pictures are too light, with grayish shadows and “bleached out” highlights.
Slight errors in shutter speed and aperture combinations can be offset when you have your pictures printed, or when you edit your pictures with your photo editing software (I prefer Macromedia Fireworks). It is usually better when pictures are overexposed rather than underexposed. Why? Because it is easier to correct overexposed shots. The subject details may be faint but they’re there and can be easily be brought up in the photo studio.
Difficult exposure conditions
1. Shooting against the light: As a general rule, the sun or your light source must always be behind you (the subject is therefore frontally lit). If the source of light however is behind your subject, you’ll be shooting against the light. Your camera meter will be fooled by the brightness of the situation and your subject will come out too dark. Thus, if you’re shooting portraits, the background will be light and the faces of your subjects will come out too dark.
How do you remedy this situation? Open your lens by one to two stops. If your meter tells you to use f/11, turn your aperture ring to f/8 or f/5.6. Or, if your camera meter tells you to use 1/500 sec, set your shutter speed dial to 1/250 or 1/125 sec.
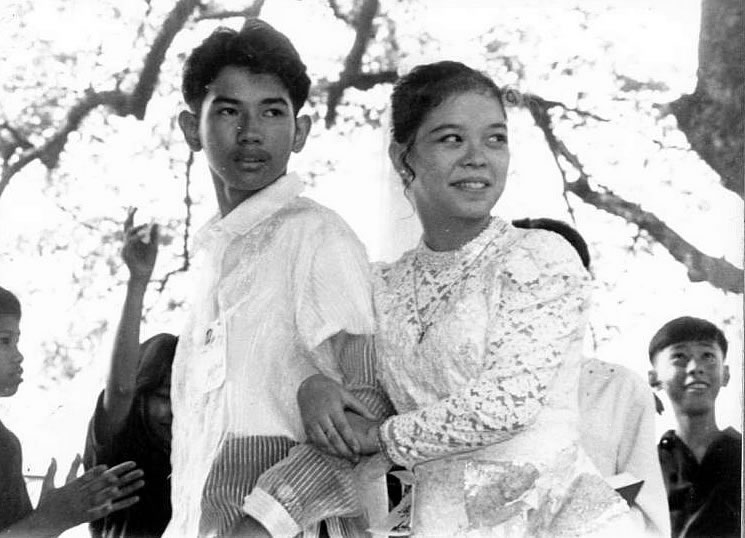 In the picture above, I had no choice except to shoot my high school students Dindo and Gracie. Why? They were too young to get married. Just kidding! Just kidding! Rewind! Rewind!
Okay, okay, rewind, in the picture above, I had no choice except to shoot my high school students Dindo and Gracie against the light. They were performing on an outdoor stage at 3 in the afternoon. The camera’s light meter, seeing all that background light, called for f/11, so I used f/5.6, giving my subjects two stops more exposure. If I had used f/11, the background would have come out all right but Dindo and Gracie would turn out too dark, their faces totally engulfed in shadows. Their light toned bridal costumes added to the problem on what the correct exposure was, but I didn’t want to go crazy thinking about this. I simply opened up the lens two stops more because of the bright background.
2. Light subject against a dark background, OR a dark subject against a light background: Your SLR camera’s reflected light meter will be fooled by either the brightness or the darkness of the background. Most of us can’t afford to buy a handheld light meter and so we can’t do any incident light reading which is the right solution for these situations. What’s the practical solution? Come very close to your subject so that it more than fills the frame and then measure the light through your camera’s TTL (through the lens) meter.
 These friends in the picture above, wearing dark toned shirts, were standing against a light toned wall. Here’s what to do. Mark your location. Come in close until your subjects’ faces fill up your viewfinder viewfinder. Meter your subjects and set your lens opening or shutter speed accordingly. Move back to your original location. Shoot! (If you’re using a zoom lens, zoom in on your subjects’ faces, meter, set your aperture, zoom out and then shoot.)
As rules of thumb, if your subject is against a bright background, set your camera two stops more than what the TTL meter indicates. If your subject is against a dark background, set your camera one stop less than the meter reading.
3. High lighting contrast: The scene has a higher brightness range than normal film can handle. While our eyes can differentiate objects in a scene with a brightness range of 1:1000, normal film only has a brightness range of about 1:100. Solutions? Use a graduated filter (please see the Wikipedia article on photographic filters) to help you deal with the high contrast, as when you’re shooting landscapes. Or, work with the situation, not against it, by coming up with a silhouette.

 The two pictures above are situations that call for “averaging” your exposure. In the first picture, if you base your exposure on the bottom portion of the picture, the sky will be completely burned out, and the clouds won’t record at all on the film. On the other hand, if you meter for the clouds, then the building will turn out too dark. Solution? Average your exposure; if the sky calls for f/16 and the foreground is at f/8, use f/11 as your opening.
In the second picture above, where should you base your exposure - on Richard, the bearded guy on the left, or on the guy on the right who obviously has used too much skin whitener?
If you meter for Richard, he’ll come out okay but the guy on the right will turn out too light, with no details on his face or shirt. But if you meter for him instead, Richard will turn out too dark. Solution? Average your exposure.

 In the first picture above, the student had a white shirt, white spots all over his hands and forearms, and too much skin whitener on his face. In the second picture above, the students had white shirts and white gloves. In this kind of situation, your camera meter will be over-influenced by all that whiteness. Result? The students’ faces in, and everything else about this student in the first picture, could turn out too dark. Solution? Set your aperture one stop wider than what your camera meter indicates. If your meter calls for f/5.6, use f/4.
 In the picture above, the students were wearing dark toned shirts and some had gold paint on their faces. If I followed the camera’s meter reading, the shirts will turn out properly exposed but the faces of the students could turn out too light. Solution? When your subjects have predominantly dark tones, use an opening one stop less than the meter reading. If the meter calls for f/8, set your lens to f/11. OR, instead of 1/250, use 1/500 sec.
Bracketing your shots
Bracketing is a technique professional photographers always use. It simply means taking extra pictures with one-half to one stop more exposure, and one-half to one stop less exposure than that indicated by the camera meter. If the reading is f/8, you should take another shot at f/5.6 (more exposure), and another shot at f/11 (less exposure). With some lenses, you can set the lens between apertures (e.g. between f/11 and f/16); that’s a half-stop.
Bracketing is absolutely essential when you’re using slide film. With color negative/color print films, it isn’t necessary since this kind of film has a wide latitude for exposure errors. Errors can be offset during the printing stage, as I mentioned above.
What if you have to maintain your aperture like when you really need the depth of field? In our example, maintain f/8 as your lens opening; if your shutter speed is 1/250 sec, shoot one frame with 1/125 (more exposure), and another at 1/500 sec (less exposure). Some camera models have an auto-bracketing feature; there’s no need to fiddle around with settings!
Photography is a technology-based art form
“From today, painting is dead!” This was the cry of doom and despair by French painter Laroche way back in 1839 when photography was introduced to the world. History has proven him wrong, however; painting is still a flourishing art form. With the advent of personal computers and their revolutionary impact on almost all aspects of life, it seems it’s now the turn of photographers to exclaim, “From today, photography is dead!”
Photography is a technology based art form. Since 1839, it has always been a silver halide based art form, meaning we’ve got to have film in order to have pictures, until today that is. Now, computers and cameras have been fused together to produce film-less digital cameras, and this is the kind of camera most of you are using right now. (Even cellphones now have cameras!) The quality of pictures produced by digital cameras, measured in megapixels, are quite good. With the pictures I have posted in my "Baptist Churches in the Philippines” blog, for example, I shot them all with a Sony 5.1 megapixel digital camera. And I didn’t have to fiddle around with shutter speed and aperture settings; the camera with its automatic functions took care of everything. All I really had to do was to point and shoot.
The camera doesn’t take the picture, you do!
A lot of professional photographers look down on “auto-photography” or what is sometimes called as “decision free” photography. These terms refer to the heavy, oftentimes complete reliance on the automatic features of today’s cameras brought by computers, microchips and electronics.
These photographers feel that relying on automation and electronics is a hindrance to a person’s creativity. They want the best of both world, actually. They value the information, the assistance given by the automatic features of today’s cameras but they also want what is known as “manual override,” that is they want to be able to turn off the camera’s automatic functions and rely on their brains, their experiences, their feelings, their sensibilities. In other words, they don’t want their cameras to take the pictures for them; they want to take the picture themselves.
Or in the words of Richard Avedon, ranked number one in a 1996 survey of photographers and photo editors, “It’s not the camera that makes a good picture but the eye and the mind of the photographer.”


