Saturday, July 21, 2007

Photojournalism (9): Learning to see; techniques in developing your creative eye

Free e-books:

(1) Inspiration: The Pros’ Secrets to Finding and Keeping it (12 pages; 879.66 kb)

(2) By Scott Bourne:

Essays on Inspiration, Creativity and Vision in Photography (47 pages; 3.02 MB)

Nine Motivational Essays on Photography (42 pages; 2.44 MB)

Video:

Developing a Creative Eye, Ep. 134: You Keep Shooting (Adorama Photography TV)

(Note: jump to techniques in developing your creative eye.)

Way back in 1989, I enrolled in a black and white photography course in an art school in Cubao. For the first assignment, the instructor asked the class to use one roll of film to shoot lines, shapes, form, textures, etc. In previous postings, I have explained and shown examples to you of these different elements of a photograph. On your own, therefore, using whatever camera you have, shoot as many pictures as you can of lines, shapes, forms, etc. This exercise will teach you how to break down an image into the different elements we have discussed.

Elegant simplicity

Later on you can combine these elements into a photograph that appeals to your own sense of beauty. Hopefully, other people will share your joy and sense of fulfillment over the pictures you have taken. My idea of beauty, if you care to know (please, please), is embodied in the Japanese ideal of “elegant simplicity.”

Charles Darwin, father of evolution, once said, “When I think of the complexity of the human eye, I shudder.” With the interplay of rods and cones which enable it, among other things, to distinguish numerous shades of colors, the human eye is so enormously complex that evolution fails dismally in explaining it. (Incidentally, two books I highly recommend to you are “Fearfully and Wonderfully Made” and “In His Image” by Philip Yancey and Dr. Paul Brand. These books about the wonders and complexities of the human body are readily available in Christian bookstores and in National Bookstore.)

http://www.digitalcameraworld.com/2015/02/04/camera-lens-vs-human-eye-free-photography-cheat-sheet/

Camera lens vs human eye
(free photography cheat sheet
from Digital Camera World)
The human eye and the camera see things differently

A basic principle you have to understand and always keep in mind is that the human eye and the camera see things differently. This is why, a lot of times, we get disappointed with the results of our pictures. Whenever we look at the subject we want to shoot, we always see a “focused” image, that is, a sharp image from foreground to background. This is because the eye, even without us consciously knowing or doing anything about it, adjusts itself to focus on whatever we are presently looking at, excluding other details in the scene. The camera cannot do this.

(If you’re using a manual focus camera, you have to turn the focusing ring until you get the right focus, that is, the image appears sharp and clear as you look at it through the viewfinder. With autofocusing systems, you just depress the shutter release a little bit and the camera automatically adjusts itself to focus on your subject.)

The difference in what the eye and what the camera see oftentimes result in a photograph that contains a lot of clutter or distracting details, which we didn’t notice while looking at the subject through the viewfinder. Take a look at the picture below (a choral competition) for example. When I was looking at the scene with the camera, I didn’t notice all the students at the background because they looked fuzzy or out of focus in the viewfinder. The camera however recorded everything - the performing students, and all the distracting details in the background.

the eye and the camera see things differently; cluttered background; photo by Atty. GalacioLater on we will discuss how to use lens openings and a shallow depth of field in erasing distracting background details. Notice for example the picture below of my cute nephew JR. (He’s cute because he looks like me!) Please notice that while JR himself is sharp and clear, the background details are deliberately blurred and out of focus.

My cute nephew JR; shallow depth of field; out of focus background; photo by Atty. GalacioProfessional photographers oftentimes derisively use the term “record shot.” Hey! “Derisive” is such a big word; I’d better check my dictionary to check if I got the spelling right! The term “record shot” is used to describe certain pictures that simply have to be taken for record purposes (to be redundant about it), or because the person paying for the photographer’s services simply wanted to have certain subjects shot. Meaning, there is nothing artistic in the subject matter or in the technique used; the photographer simply pointed his or her cameras at the subject, and took the shot.

Photographs have the power to convey a mood or share your insights

If you are using your camera just to do record shots, you are definitely missing out on what photography is all about as an art form. Photographs have the power to convey a mood or share your insights with others. All you really have to do is to begin seeing things, not just looking at them.

Remember what the fox said to the Little Prince? “What is essential is invisible to the eyes; one must look with the heart.” Photographers can see beauty where other people can only see mundane, crass, everyday things. Photographers, like all truly creative artists, have learned, as Walt Whitman (the father of free verse, the poet of democracy) once wrote, “to see beauty in a single blade of grass.” Wow!

Techniques in developing your creative eye

The question most of you must be asking desperately by now is, “How? How do I develop this visual awareness, this creative eye?” While some people are blessed with innate artistic talents, most of us can learn how to be creative with a camera. As Ernst Haas once said, “If art is aristocratic, then photography is its democratic voice.” The following are some of the techniques in developing your creative eye.

Rizal High School 1989; learning to see; reflections; photo by Atty. GalacioLook at the picture above. Since you can’t turn your computer monitor upside down, stand up and then look at this picture with your head upside down. I know it’s a little bit acrobatic but hey it’s worth it! You will know what this picture is all about. The image of the trees, students and building are all repeated as reflections in the water in the foreground area. (This is probably the best picture I have ever taken in my life.)

I took this picture shown above way back in October 1989. I’ve noticed previously that every time it rained hard, the front area of the gymnasium of Rizal High School in Pasig would become flooded and there would be reflections on the water of the trees and that building on the background. I decided that this would make a good subject for a photograph. And so I brought my beloved Canon AE-1 Program everyday with me to school, and waited for the rain to come. I brought along my camera every day for one month, and it didn’t rain for one whole month! And so one day, I simply gave up and left my camera at home. Guess what happened? It rained hard that day!

I went home after the lunch break (pizza!), got my camera and loaded it with Negrapan (a black and white film manufactured in Spain). I knew I couldn’t use color film because the water was muddy brown in color; with monochrome film, it didn’t matter. I didn’t have a zoom lens at that time and so I used my Canon FD f/1.8 normal lens. I got back to school at around four in the afternoon. I focused on the reflections, and because it was late afternoon, I was forced to use a slow shutter speed of 1/30 sec. with an f/5.6 lens opening, for the right depth of field. (Later on we’ll discuss shutter speeds, lens openings and depth of field.)

[1] Pay attention to details

When you’re just starting to learn about photography, don’t consider anything too small, too trivial or too insignificant. The folk dancer in picture above has a V-shaped black ribbon on her costume; notice how the out of focus highlights on the background form an inverted letter V.

Pay attention to details; photo by Atty. Galacio

Pay attention to details! When you’re just starting to learn about photography, don’t consider anything too small, too trivial or too insignificant! If you look hard enough, you will notice that cute ribbon tied to my student's shoe buckle ... you know how vain girls are! I was able to take only one shot before my student kicked me away!

Pay attention to details; photo by Atty. Galacio

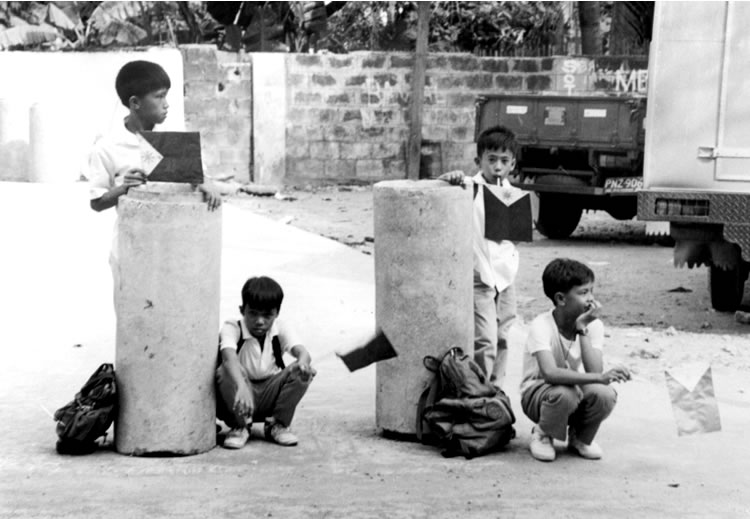
How many pipes are there in the picture above? Two. How many boys are standing up? Two. How many boys are sitting down? Two. How many boys are looking towards the right? Two. How many boys are looking towards the camera? Two.

Pay attention to details; serendipity; photo by Atty. Galacio

[2] Learn from paintings, music videos, comic books
, poetry, etc.


Look at paintings; watch good music videos. Look at comic books on superheroes; they have brilliant colors, subtle shadings, clean and dynamic lines. By the way, which superhero works as a photojournalist? Peter Parker, a.k.a. Spiderman!

Read poetry, short stories and other creative fiction, and then visualize in your mind the ideas, emotions expressed in them. One time, after reading Tennyson’s poem “Flower in a Crannied Wall,” I took my camera and for nearly a week, shot a lot of walls. I couldn’t find a single flower in a crannied wall but I did find a lot of small plants, a lot of moss between cracks in the walls, and our neighbors had a jolly good time watching me inspecting and shooting close-ups of walls in our compound!

[3] Practice visualizing things

In the novel “The Heart is a Lonely Hunter” written by Carson McCullers, Mickey, the main character, wanted desperately to learn how to play the violin. She drew a violin on a piece of cardboard, cut it out and then listened for weeks to the classical music being played by a neighbor. Wow, talk about visualization! What happened? Did Mickey become a world-class violinist? Of course not! What do you think this is, real life? Get real! This is fiction! Mickey became a waitress at the end of the novel.


[4] Look for symbolism and relationships

I took this picture way back in 1986 during the original EDSA Revolution. What are the symbolisms here? The soldier is the defender of freedom and democracy (symbolized by the Philippine flag in the background) and the child he’s carrying is the beneficiary of that freedom and democracy.

EDSA Revolution 1986; symbolisms and relationships; photo by Atty. Galacio

Look for symbolism and relationships. I tried to say in the picture above that students (represented by the bags) were waiting for the building to be finished. I know, I know, it’s really corny!

Symbolisms and relationships; photo by Atty. Galacio

[5] Practice doing still life

These milk cans in the picture below were rusting away near a santol tree. I’ve seen them several times before but I felt that they needed something else to perk up the image. I looked around, saw an old rubber doll my cute nephew (who looks like me) had outgrown, and placed it inside one of the milk cans.

form; still life; 1992; photo by Atty. Galacio

Visualize Better Photos

Wednesday, July 18, 2007

Photojournalism (8): Color or black and white?

Update as of September 18, 2023:

If you’re a high school or grade school student in the Philippines who’s joining the photojournalism contest in the division, regional, or national press conference, I’m offering two free resources to you :

A. 900-plus interactive exercises on English grammar, vocabulary, reading comprehension, verbal analogy, etc (with around 200 megabytes total file size). The exercises have time limit and automatic scoring, with an average of 10 items per exercise.

Examples of these interactive exercises are: Common English grammar errors: Exercise 01 (nouns - confusions of number); Phrasal Verbs: Expressions with Go; English Placement Test (45 items).

B. 200-plus resources (JPG, PDF, MP4, etc.) on photography and photojournalism, with 600-plus megabytes total file size. For some examples of these resources, surf to the “Free photography e-books, cheat sheets” page.

For the download links and more information about how to use the interactive exercises, please surf to my “Better English resources and exercises” blog. Please inform your journalism teacher/schoolpaper adviser or your parents about these resources before downloading them.

If you have any question about downloading or using these free resources, please email me (after informing your journalism teacher/schoolpaper adviser or your parents). I’ll be able to reply to you within two to three days; if you don’t see my reply in your Inbox, check your Spam folder. Or, you can text me.

Also, if you win in the photojournalism contest at whatever level (district, division, regional, or national), you can send me your prizewinning pictures, and I will feature them in a blog post.

Atty. Gerry T. Galacio
gtgalacio@yahoo.com
0927-798-3138


Look at the two pictures below of the athletic oval and Main Building in Rizal High School (Pasig City). One is in black and white, the other in full color. Which picture do you like better?

Rizal High School, Pasig 1995; photo by Atty GalacioRizal High School, Pasig, 1996; photo by Atty. GalacioAs I explained in the Introduction, this series on photojournalism is specifically meant for those of you who are schoolpaper staffers and participants to the press conferences, whether in grade school or high school, in whatever level (division, regional, or national). But if you’re none of these and just someone who likes photography, hey, you’re still welcome!

Relevant materials:

Color temperature scale (see also the graphic near the bottom of this page)

Learn the Basics of Color Theory to Know What Looks Good

Create Visual Depth in Your Photographs with Color (The Color Wheel)

Color in photography: The color wheel explained


Color Theory in Photography (Using complimentary, analogous, and monochromatic in photographs)

You will notice that all of the pictures I have posted so far are black and white pictures; to be more technical about, they are monochromes. When I was still a journalism teacher, I always told my students that a good photographer is someone who can create good black and white pictures. I don’t know if this is accurate or not, but I’ve known a lot of photographers who can produce excellent color pictures but who cannot come up with satisfactory black and white images. Of course, “good”, “excellent”, and “satisfactory” are all relative terms, but shooting black and white pictures seems to be difficult for a lot of photographers. This is primarily because color is such a dominating element.

Shooting black and white photos: think in various shades of gray

When you’re shooting black and white photographs, you’ve got to deliberately think of the various colors as being black, white, or shades of gray in the final picture.
You’re forced to think of the image in terms of the basic elements - line, shape, form, tone, pattern, etc. (This is why shooting black and white photographs is an excellent way to learn photography.) As one Kodak advertisement puts it, “The absence of color ... the presence of imagination!”

“Colour my world ...” This is the title of a hit song by the group Chicago in the 1970’s back when Peter Cetera was still its lead singer and bell bottom pants were still in vogue. Peter Cetera has been going solo, and bell bottom pants now belong to museums for today’s generation to look at and say, Yuck! How baduy!” The expression “colour my world” still best sums, however, the near-total dominance of color film and color pictures in the field of photography. Say “photography” and people will automatically think of color pictures.

With the advent of digital cameras, however, black and white photography has become and more marginalized, as it were. It’s very difficult now to find locally materials for black and white photography like film, photo paper, and darkroom chemicals. (If you are from Metro Manila, try looking for these materials in R. Hidalgo St. in Quiapo, Manila.)

Photojournalism used to be synonymous with black and white photographs

Shooting Black and White on your D-SLR
free e-book by photoanswers.co.uk
(7.15 MB, 22 pages)
Photojournalism was once synonymous with black and white photographs. Today, however, practically all national and international news publications use color news pictures (except for occasional photo essays in monochrome). But there are still people who believe that news pictures should always be shot in black and white. Sebastiao Salgado, considered as the world’s best photojournalist, for example believes that color tends to prettify things, even images of death, squalor or poverty. He believes that black and white has a more realistic, more “gritty” feel.

Most schoolpapers, elementary and high school levels, in the Philippines do not have the budget to produce publications in full color. (Some schools thus resort to the practice of producing two issues of a schoolpaper – a limited edition in full color for the group competitions, and another edition without color for distribution to the students.)

Speaking of budgets, Republic Act 7079 or the “Campus Journalism Act of 1990” gives the schools the right to collect schoolpaper fees, but for one reason or another, the Department of Education only allows voluntary contributions. Needless to say, schoolpapers have been having a difficult time financially, with the advisers oftentimes forced to shell out their own money.

Anyway, a good solution is for the schools to invest in digital cameras (the higher the megapixels, the better). Digital cameras have the capacity to shoot in both color, and in black and white. You don’t have to buy any film, unlike in traditional film-based cameras. After you’re through shooting, you just plug in your camera into the computer, and save or burn the pictures on your hard disk or a CD You can also transfer your pictures on a USB flash drive.

By whatever way you save your pictures from a digital camera, you can then bring them to the printing press. The press will then incorporate your pictures right into the electronically set pages, using Pagemaker, Coreldraw, Photoshop, etc. Also, if you had shot your pictures in color, it’s a whiz using these software programs to turn them into black and white pictures.


In the US, the movie “It’s a Wonderful Life” starring James Stewart is part of the Christmas Day tradition. The original movie dating back to the 1940’s was shot in black and white, but now, the movie has been turned into color, through a process known as “colorization.” What’s the better version - the original black and white, or the colorized version? Me, I like the black and white version.

What about that heartwarming and blockbuster movie “Big” directed by Penny Marshall? Remember that last scene, that bittersweet separation as lead actor Tom Hanks walks away from Elizabeth Perkins, with gold, yellow, and orange leaves falling from the trees and swirling about on the streets? Would the scene be just as effective, just as poignant if it had been shot in black and white? I don’t think so. What’s my point? Some images look good in black and white, some really look good in color.

When you’re shooting in color, you’ve got to be aware of the color or colors within the image. This may sound basic (or even nonsense to some of you), but you have to admit that we oftentimes take color for granted. In one National Secondary Schools Press Conference in the late 1980’s, for example, the topic for the feature writing contest was this: “How do you explain the color red to someone born blind?”

Go ahead, try explaining it ... you’ll realize how we take colors so much for granted!

http://www.techradar.com/how-to/photography-video-capture/cameras/what-is-color-temperature-free-photography-cheat-sheet-1320923
Color temperature scale
(free cheat sheet from Tech Radar/
Digital Camera World)
Color photography: classifying colors; psychological, emotional, and cultural reactions to colors; color me red

One way of classifying colors is to divide them into (1) warm and cool colors, and (2) harmonious and conflicting colors. (See the color wheel infographic from Digital Camera World below.)

Colors that tend to arouse warm feelings in people include yellow, orange, magenta, and red.

Cool colors that convey feelings of calmness or placidity are blue, mint, green, and cyan.

Conflicting colors are those found on opposite sides of the color wheel: red and cyan; blue and yellow; magenta and green.

Harmonious colors, which provide the viewer a relaxed, comfortable feeling, are those near each other in the color wheel: red and yellow; blue and magenta; green and cyan.

(Note: Click the image below to see a bigger-sized image of the color wheel infographic from Digital Camera World.)

https://2.bp.blogspot.com/-a2l59CWQwcU/WfvR3ZrqTXI/AAAAAAAAIfw/xGIHoPJew88uKLjrbGtyLihvUfJpGdtbgCLcBGAs/s1600/Digital%2BCamera%2BWorld%2Bcheet%2Bsheat%2BWhat_is_the_color_wheel_cheat_sheet%2B1000%2Bpx.jpg

Relevant article and charts:

Color Psychology: The Emotional Effects of Colors

Color Meanings and Symbolism of Colors (charts)
Psychological, emotional, and cultural reactions to colors:

White - purity, classic, clean, airy, cool, pristine (but if overused with no contrasting colors , it can appear cold and sterile)

Gray - neutral, classic, cool, sober, practical, corporate , timeless, quality

Black - powerful, bold, strong, dramatic, expensive, magical, mysterious, sexy, sophisticated, prestigious

Blue - authoritative, dependable, professional, conservative, confident, serene

Green - fresh, springlike, outdoorsy, happy, lively

Red - exciting, hot, intense, passionate, dramatic, energetic, dynamic, daring, provocative

Two things you have to remember about the color red:

(1) Red is comparatively rare in nature.

(2) Red visually 'stands out' as compared to blue or green.


From Color to Black and White

Monday, July 16, 2007

Photojournalism (7): Element of perspective

Update as of September 18, 2023:

If you’re a high school or grade school student in the Philippines who’s joining the photojournalism contest in the division, regional, or national press conference, I’m offering two free resources to you :

A. 900-plus interactive exercises on English grammar, vocabulary, reading comprehension, verbal analogy, etc (with around 200 megabytes total file size). The exercises have time limit and automatic scoring, with an average of 10 items per exercise.

Examples of these interactive exercises are: Common English grammar errors: Exercise 01 (nouns - confusions of number); Phrasal Verbs: Expressions with Go; English Placement Test (45 items).

B. 200-plus resources (JPG, PDF, MP4, etc.) on photography and photojournalism, with 600-plus megabytes total file size.

To avail of these free resources, email me with the following information: your name and school; the name and email address of your journalism teacher or schoolpaper adviser (or that of your parents); the division, regional, or national press conference that you’re joining.

(I’ll be able to reply to you within two to three days; if you don’t see my reply in your Inbox, check your Spam folder. Or, you can text me.)

Atty. Gerry T. Galacio
gtgalacio@yahoo.com
0927-798-3138


Photographs are two dimensional objects; they’re flat with height and width but no depth (the third dimension). Remember our previous discussion of the x-, y-, and z-axis? We have already learned that the elements of forms and texture through lighting, highlights, and shadows can convey the illusion of depth. The best element, however, which enables a two-dimensional image to achieve the impression of being three-dimensional is “perspective.” The term refers to the relationships in space and the relative sizes of objects in a scene. It may either be linear or aerial.


linear perspective; photo by Atty. GalacioLinear perspective

Objects of the same size diminish in their apparent size the farther away they are from the photographer. On the other hand, a smaller object located closer to the camera will appear almost the same size as a larger object located at a farther distance.
Examples are

(1) the students at the top of the picture seem smaller than the hollow blocks at the bottom portion;
 
linear perspective; photo by Atty. Galaciolinear perspective; photo by Atty. Galacio


(2)
the guy in front, who’s hogging all the chairs for himself, appear much bigger than the other students who are located farther away from the camera; and


(3)
the jeepney located nearer to the camera appears to be almost as wide as the building behind it.

With the picture of the students and the hollow blocks, what I really wanted to shoot was the graffiti on the hollow blocks. I held the camera to shoot in the horizontal format (more on formats later on) but I felt something was missing. Boy, I’ve always wanted to say something like this! Then I saw these students whose portraits I had just taken, walking off to return to their classes. I focused on the foreground, turned the camera vertically and included the students in the background. Just when I pressed the shutter release button, the girl in the middle wearing a dark T-shirt looked back at me. Serendipity!

Because of linear perspective, the hollow blocks in the foreground look much bigger than those in the background. Also, they seem to recede into the vanishing point. But that girl really makes the picture!

perspective; vanishing point; photo by Atty. Galacio Linear perspective, parallel lines, and vanishing points

You have probably learned from your geometry subject what Euclid, a Greek mathematician, the father of geometry, declared centuries ago. Euclid said, “Parallel lines do not meet.” Well excuse me, Mr. Euclid, Sir! In photography, parallel lines can be made to appear to converge as they recede into the so-called “vanishing point.” This is another aspect of linear perspective. Take a look, for example, at the posts of the waiting shed above which appear to become smaller and smaller as they recede into the background, and finally converging into the vanishing point.

Linear perspective and diagonal lines

A very easy, yet very effective way of creating depth is by using diagonal lines. Shoot your subject from the side, and you’ll get a diagonal line. To make a better photograph, anchor the corners with the diagonal lines. Example is this picture below of CAT cadets taking refuge from the downpour under the waiting shed, with the edge of the roof and the walkway as diagonal lines. (Depth is also created with the posts of the shed becoming increasingly smaller from left to right.)

perspective; diagonal lines; parallel lines; photo by Atty. Galacio


Aerial perspective


Objects located farther away from the camera will appear lighter in tone or less saturated in color than objects located closer to the camera. This is caused by smoke, mist, fog, or atmospheric haze. “Aerial perspective” is another way of achieving a sense of depth in your pictures.