| Free e-books: (1) Inspiration: The Pros’ Secrets to Finding and Keeping it (12 pages; 879.66 kb) (2) By Scott Bourne: Essays on Inspiration, Creativity and Vision in Photography (47 pages; 3.02 MB) Nine Motivational Essays on Photography (42 pages; 2.44 MB) Video: Developing a Creative Eye, Ep. 134: You Keep Shooting (Adorama Photography TV) |
Way back in 1989, I enrolled in a black and white photography course in an art school in Cubao. For the first assignment, the instructor asked the class to use one roll of film to shoot lines, shapes, form, textures, etc. In previous postings, I have explained and shown examples to you of these different elements of a photograph. On your own, therefore, using whatever camera you have, shoot as many pictures as you can of lines, shapes, forms, etc. This exercise will teach you how to break down an image into the different elements we have discussed.
Elegant simplicity
Later on you can combine these elements into a photograph that appeals to your own sense of beauty. Hopefully, other people will share your joy and sense of fulfillment over the pictures you have taken. My idea of beauty, if you care to know (please, please), is embodied in the Japanese ideal of “elegant simplicity.”
Charles Darwin, father of evolution, once said, “When I think of the complexity of the human eye, I shudder.” With the interplay of rods and cones which enable it, among other things, to distinguish numerous shades of colors, the human eye is so enormously complex that evolution fails dismally in explaining it. (Incidentally, two books I highly recommend to you are “Fearfully and Wonderfully Made” and “In His Image” by Philip Yancey and Dr. Paul Brand. These books about the wonders and complexities of the human body are readily available in Christian bookstores and in National Bookstore.)
 |
A basic principle you have to understand and always keep in mind is that the human eye and the camera see things differently. This is why, a lot of times, we get disappointed with the results of our pictures. Whenever we look at the subject we want to shoot, we always see a “focused” image, that is, a sharp image from foreground to background. This is because the eye, even without us consciously knowing or doing anything about it, adjusts itself to focus on whatever we are presently looking at, excluding other details in the scene. The camera cannot do this.
(If you’re using a manual focus camera, you have to turn the focusing ring until you get the right focus, that is, the image appears sharp and clear as you look at it through the viewfinder. With autofocusing systems, you just depress the shutter release a little bit and the camera automatically adjusts itself to focus on your subject.)
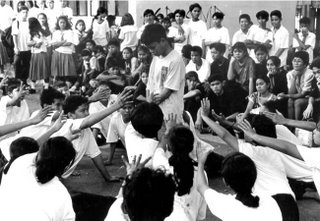
The difference in what the eye and what the camera see oftentimes result in a photograph that contains a lot of clutter or distracting details, which we didn’t notice while looking at the subject through the viewfinder. Take a look at the picture below (a choral competition) for example. When I was looking at the scene with the camera, I didn’t notice all the students at the background because they looked fuzzy or out of focus in the viewfinder. The camera however recorded everything - the performing students, and all the distracting details in the background.
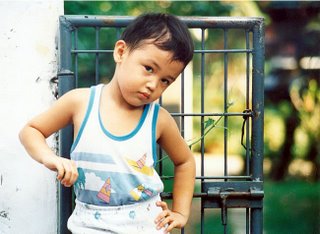
 Later on we will discuss how to use lens openings and a shallow depth of field in erasing distracting background details. Notice for example the picture below of my cute nephew JR. (He’s cute because he looks like me!) Please notice that while JR himself is sharp and clear, the background details are deliberately blurred and out of focus.
 Professional photographers oftentimes derisively use the term “record shot.” Hey! “Derisive” is such a big word; I’d better check my dictionary to check if I got the spelling right! The term “record shot” is used to describe certain pictures that simply have to be taken for record purposes (to be redundant about it), or because the person paying for the photographer’s services simply wanted to have certain subjects shot. Meaning, there is nothing artistic in the subject matter or in the technique used; the photographer simply pointed his or her cameras at the subject, and took the shot.
Photographs have the power to convey a mood or share your insights
If you are using your camera just to do record shots, you are definitely missing out on what photography is all about as an art form. Photographs have the power to convey a mood or share your insights with others. All you really have to do is to begin seeing things, not just looking at them.
Remember what the fox said to the Little Prince? “What is essential is invisible to the eyes; one must look with the heart.” Photographers can see beauty where other people can only see mundane, crass, everyday things. Photographers, like all truly creative artists, have learned, as Walt Whitman (the father of free verse, the poet of democracy) once wrote, “to see beauty in a single blade of grass.” Wow!
Techniques in developing your creative eye
The question most of you must be asking desperately by now is, “How? How do I develop this visual awareness, this creative eye?” While some people are blessed with innate artistic talents, most of us can learn how to be creative with a camera. As Ernst Haas once said, “If art is aristocratic, then photography is its democratic voice.” The following are some of the techniques in developing your creative eye.
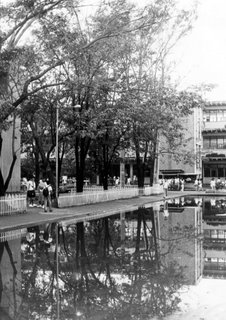 Look at the picture above. Since you can’t turn your computer monitor upside down, stand up and then look at this picture with your head upside down. I know it’s a little bit acrobatic but hey it’s worth it! You will know what this picture is all about. The image of the trees, students and building are all repeated as reflections in the water in the foreground area. (This is probably the best picture I have ever taken in my life.)
I took this picture shown above way back in October 1989. I’ve noticed previously that every time it rained hard, the front area of the gymnasium of Rizal High School in Pasig would become flooded and there would be reflections on the water of the trees and that building on the background. I decided that this would make a good subject for a photograph. And so I brought my beloved Canon AE-1 Program everyday with me to school, and waited for the rain to come. I brought along my camera every day for one month, and it didn’t rain for one whole month! And so one day, I simply gave up and left my camera at home. Guess what happened? It rained hard that day!
I went home after the lunch break (pizza!), got my camera and loaded it with Negrapan (a black and white film manufactured in Spain). I knew I couldn’t use color film because the water was muddy brown in color; with monochrome film, it didn’t matter. I didn’t have a zoom lens at that time and so I used my Canon FD f/1.8 normal lens. I got back to school at around four in the afternoon. I focused on the reflections, and because it was late afternoon, I was forced to use a slow shutter speed of 1/30 sec. with an f/5.6 lens opening, for the right depth of field. (Later on we’ll discuss shutter speeds, lens openings and depth of field.)
[1] Pay attention to details
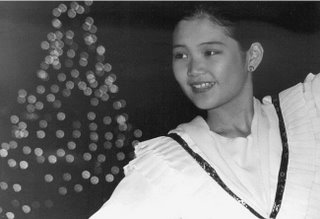
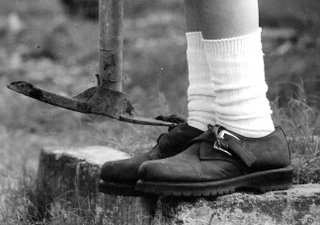
When you’re just starting to learn about photography, don’t consider anything too small, too trivial or too insignificant. The folk dancer in picture above has a V-shaped black ribbon on her costume; notice how the out of focus highlights on the background form an inverted letter V.
Pay attention to details! When you’re just starting to learn about photography, don’t consider anything too small, too trivial or too insignificant! If you look hard enough, you will notice that cute ribbon tied to my student's shoe buckle ... you know how vain girls are! I was able to take only one shot before my student kicked me away!
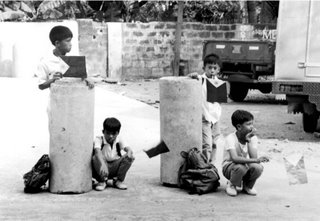
How many pipes are there in the picture above? Two. How many boys are standing up? Two. How many boys are sitting down? Two. How many boys are looking towards the right? Two. How many boys are looking towards the camera? Two.
[2] Learn from paintings, music videos, comic books, poetry, etc.
Look at paintings; watch good music videos. Look at comic books on superheroes; they have brilliant colors, subtle shadings, clean and dynamic lines. By the way, which superhero works as a photojournalist? Peter Parker, a.k.a. Spiderman!
Read poetry, short stories and other creative fiction, and then visualize in your mind the ideas, emotions expressed in them. One time, after reading Tennyson’s poem “Flower in a Crannied Wall,” I took my camera and for nearly a week, shot a lot of walls. I couldn’t find a single flower in a crannied wall but I did find a lot of small plants, a lot of moss between cracks in the walls, and our neighbors had a jolly good time watching me inspecting and shooting close-ups of walls in our compound!
[3] Practice visualizing things
In the novel “The Heart is a Lonely Hunter” written by Carson McCullers, Mickey, the main character, wanted desperately to learn how to play the violin. She drew a violin on a piece of cardboard, cut it out and then listened for weeks to the classical music being played by a neighbor. Wow, talk about visualization! What happened? Did Mickey become a world-class violinist? Of course not! What do you think this is, real life? Get real! This is fiction! Mickey became a waitress at the end of the novel.
[4] Look for symbolism and relationships
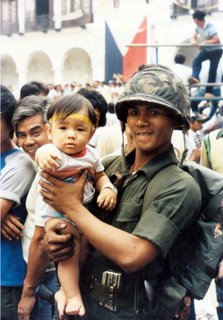
I took this picture way back in 1986 during the original EDSA Revolution. What are the symbolisms here? The soldier is the defender of freedom and democracy (symbolized by the Philippine flag in the background) and the child he’s carrying is the beneficiary of that freedom and democracy.
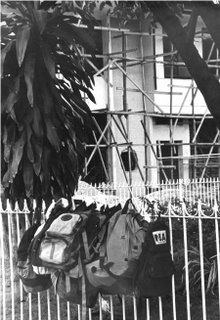
Look for symbolism and relationships. I tried to say in the picture above that students (represented by the bags) were waiting for the building to be finished. I know, I know, it’s really corny!
[5] Practice doing still life
These milk cans in the picture below were rusting away near a santol tree. I’ve seen them several times before but I felt that they needed something else to perk up the image. I looked around, saw an old rubber doll my cute nephew (who looks like me) had outgrown, and placed it inside one of the milk cans.

Visualize Better Photos


No comments:
Post a Comment