If you’re a high school or grade school student in the Philippines who’s joining the photojournalism contest in the division, regional, or national press conference, I’m offering two free resources to you :
A. 900-plus interactive exercises on English grammar, vocabulary, reading comprehension, verbal analogy, etc (with around 200 megabytes total file size). The exercises have time limit and automatic scoring, with an average of 10 items per exercise.
B. 200-plus resources (JPG, PDF, MP4, etc.) on photography and photojournalism, with 600-plus megabytes total file size. For some examples of these resources, surf to the “Free photography e-books, cheat sheets” page.
If you have any question about downloading or using these free resources, please email me (after informing your journalism teacher/schoolpaper adviser or your parents). I’ll be able to reply to you within two to three days; if you don’t see my reply in your Inbox, check your Spam folder. Or, you can text me.
Atty. Gerry T. Galacio
gtgalacio@yahoo.com
0927-798-3138
Pictures can be classified in the following ways:
unique images
words and numbers
juxtaposition
point pictures
sequence shots
establishing shots
key personalities
We have just taken up photographic composition, and one other way for you to decide how best to compose your photographs is to think about what type of picture you want.
Unique images
What do bored people usually say? “Done that, been there, seen it before!” This category covers all photographs whose impact lies on their never having been seen before. I’m sure you’ve heard the song “Footprints in the Sand.” It was a number one hit on the Billboard gospel chart many, many years ago, and then it crossed over, again as number one, into the pop chart. Well, the picture above can be titled “Footprints in the Corridor.” It was about 8 AM, and I came across a group of students who were participating in a Speech Festival. They had covered their whole bodies with a chalk-like powder. To get to the venue of the competition, they had to walk though the corridor, leaving their footprints all over the place.
I hesitated shooting the footprints. I wanted to save my Kodak Tri-X film for the contest, and I wasn’t sure if those footprints had any significant value as the subject of a photograph. (I also kept thinking about Alexander Defoe and his fictional character Robinson Crusoe finding that single footstep on the beach.) I managed to shoot two frames before the janitor mopped away those footprints.
Try shooting the audience, the spectators
Who knows, you might be able to shoot an interesting spectator like this Katipunero in the picture above? Notice that he’s the only guy in the picture. You might also be able to shoot a girl, watching from the sidelines, who has too much make-up, as in the picture below.
Or you can turn the tables and try shooting the photographers covering an event as in the picture below. Here, my attention was caught by that old photographer (kneeling) on the right.
Words, letters, numbers
These elements may be used to attract the viewer’s attention. Always be on the lookout for announcements or ads which have humorous, grammatical errors. In the picture below, the words written in chalk on the hollow blocks, at first glance, seem to have been the handiwork of a dyslexic individual. On a closer look, however, the letters spell out several words and names like “Guess,” “Ryan” and “Gwen.” Speaking of dyslexia, did you know MI-3 actor Tom Cruise and singer-actress Cher suffered from dyslexia?
Juxtaposition
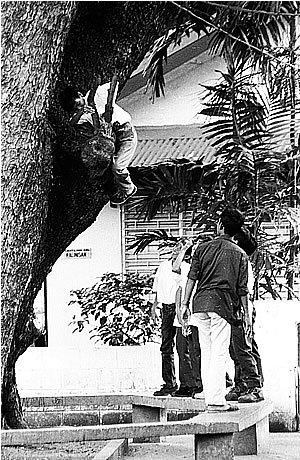
In juxtaposition, you combine two or more images into a single photograph in order to express an idea, emotion, or to show a certain relationship. In the picture below, for example, I combined the images of man (the students), nature (the towering acacia tree) and a man-made object (the partially hidden backboard on the right). Symbolism? Possibly, Mother Nature reigns supreme over everything, or something of that sort …
Point pictures; fillers
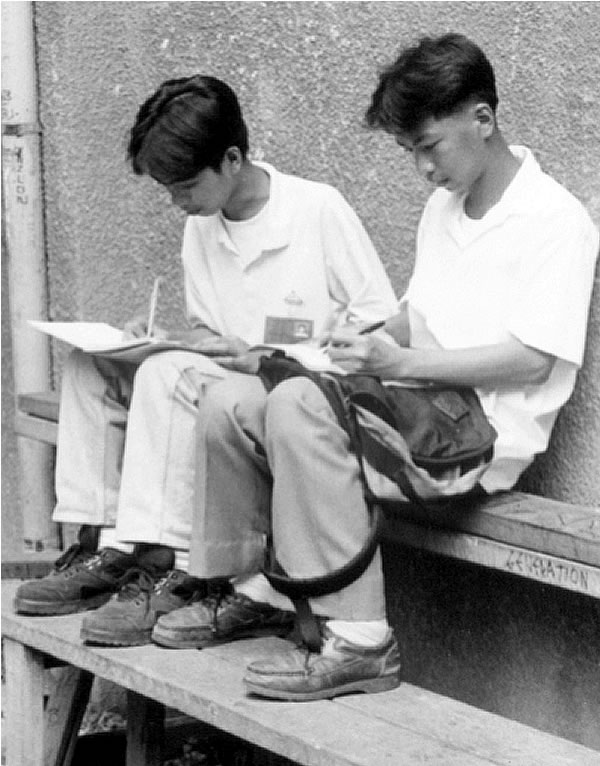
Point pictures are those used by publications to illustrate certain portions of an article or used as fillers for layout purposes. (When we discuss campus news photography, I will tell you about shooting and keeping stock pictures.) For example, the picture below of students studying can be used for a variety of articles.
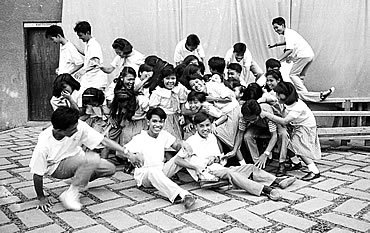
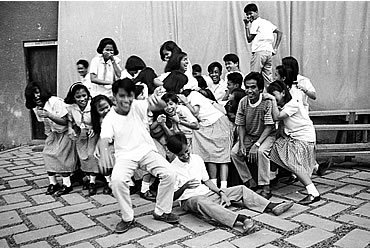
The pictures below are sequence shots of a senior class having their yearbook picture taken. I shot these pictures way back in 1991 with my beloved Canon AE-1 Program camera fitted with an FD f/1.8, 50 mm lens with a yellow-green filter and power winder. (This kind of filter makes black and white pictures more vibrant.) After I shot the formal class picture, the fun began. If you mouse over each picture, the caption will appear for a few seconds.
Establishing shots
Establishing shots are usually wide angle shots that show the viewer the physical context or the setting of an event, activity or program - What is the program all about? Who are the participants? Who are the spectators? Where is the venue?
Key personalities
The key personalities in any program or activity may be the lead actors, actresses, directors, the judges, etc.
Be a better writer or editor through StyleWriter 4: this software checks 10,000 words in 12 seconds for hundreds of style and English usage issues like wordy and complex sentences, passive voice, nominalization, jargon, clichés, readability, spelling, etc.
StyleWriter 4 graphs your style and sentence variety, and identifies your writing habits to give an instant view of your writing. You can learn to adjust your writing style to suit your audience and task. You can learn, for example, the writing style of Newsweek, Time, The Economist, and Scientific American.
StyleWriter 4 is widely used in the US federal government (for example, the Environmental Protection Agency). It can be used by educators, students, and professionals in various fields - business, law, social or physical science, medicine, nursing, engineering, public relations, human resources, journalism, accounting, etc. Download your free 14-day trial copy now.
From your English and Filipino subjects, you will remember that your essays (or compositions) need a certain structure – the introduction, the body and the ending or conclusion. Everything has to fit together just right. As your language teachers would say, your composition needs unity or coherence.
If you hang around photographers (whether professionals or serious hobbyists), you will constantly hear the word “composition.” Just like with your essays, the elements of your photographs have to fit just right, with no extraneous details. With photography, you’re concerned with the best possible ways to come up with aesthetically pleasing images. “To the max,” as some of you might say.
We have already discussed some “rules” and “techniques” in photography, like the Rule of Thirds, the use of diagonal lines, quality and direction of light, etc. If you’re a beginning photographer, it’s good training for you to look at pictures in books and magazines taken by famous photographers, and analyzing them in terms of the rules or techniques.
Photography and “A House Full of Memories”
I remember way back in 1979, I saw an award-winning picture taken by Ed Santiago, who is considered as the dean of photojournalists in the Philippines. It was a picture of a row of the century old Spanish type houses in Vigan, Ilocos Sur. That picture (entitled “A House Full of Memories”) greatly encouraged me to learn photography. Looking back now, that award winning picture used diagonal lines, patterns and natural frames.
In one magazine interview, Ed Santiago said that he discouraged his children from taking up photography because of the low pay and the hardships involved. What happened? You guessed it right; all his children went into photography as their careers.
I had the privilege of meeting Ed Santiago during the 1993 National Secondary Schools Press Conference in Rizal High School in Pasig. I was helping out the NSSPC organizers led by Miss Elena Tanodra when to my surprise, Ed Santiago asked me to help him out by being one of the members of the panel of judges for the photojournalism competition. That was when I told him about “A House Full of Memories” and its impact on me.
Learning good photography from National Geographic magazines
One cheap way of learning how to shoot good pictures is to buy the old editions of National Geographic magazines, available in second hand bookstores. The photographers who work for this magazine are some of the best in the world, and you will learn a lot from looking and analyzing their pictures. One article I read said that photographers for National Geographic (before the advent of digital photography) were provided with several hundred rolls of film just for one assignment. Wow!
For beginning photographers, the tendency with having that many rolls of film is to shoot wildly, shooting anything that moves or anything that crosses our viewfinder, hoping that we will somehow produce a good picture. In one interview before he died in 1985, world famous Ansel Adams said that he came to a point in his career that he could expect to get only three good pictures for every roll of film he shot.
Having seen good photographs by good photographers and analyzing them in terms of the techniques used, you will become more discriminating in your choice of shots. You will be able to decide almost instantaneously what photographic techniques to use as the image or the event develops (no pun intended) before you.
What Makes a Great Picture? (National Geographic)
Making Simply Beautiful Photographs (National Geographic)
Decide first what theme, emotion, idea, or concept you want to convey
Paul Brand, considered as the world’s best documentary photographer, once said, “The world is full of picture makers who have nothing to say.”One good approach is to decide what theme, emotion, idea or concept you want to convey to your viewers. (Remember our discussion on learning how to see photographically?) After that, you can then choose only those elements or techniques that would help express such theme or idea. Ask yourself, “What do I want to say? What do I want this picture to express to the viewer? How do I want the viewer to react? ” The next things to ask are, “What elements do I emphasize or exclude, what techniques do I use to express this theme, this emotion?”
The acacia trees in the picture above, I’m told, have been part of Rizal High School in Pasig since the early 1900’s. The school was established in 1902 by the “Thomasites,” the first group of American teachers who came to the Philippines after the US gained possession of the Philippines from the Spaniards. I remember studying under these trees when I was a high school student in the 1970’s. I remember being chased around these trees by a lot of pretty girls. Hey, what can I say? I owed a lot of people a lot of money in those youthful days!
Fast forward from the 1970’s to 1991. I was then working in my alma mater (which is Latin for “pure or chaste mother” if you care to know). I wanted a picture that would express the idea that these trees have been silent witnesses to the lives of thousands of students who have studied in this school over more than ninety years. (Rizal High School has been credited in the Guinness Book of World Records as the biggest school in the world with over 26,000 students. But as of schoolyear 2006-07, its enrollment went down to around 8,000. Reason is, a lot of the annexes have become independent high schools.) I wanted to express the idea that while some things may come and go, these trees will always be there.
I focused on the nearest tree, centering it on the viewfinder. I loved the interplay of the late afternoon sunlight and the shadows on the trees and the wall. I felt however that there was something missing from the picture, and so I waited. Then I saw two students walking behind me. I raised my camera, and when they were just a little beyond the shadows on the wall, I took the picture.
These students provide the photograph a sense of scale in that we can estimate the size of the acacia trees through them. They also provide a sense of action; notice that they’re walking together in perfect cadence. The acacia tree and the boys both cast their shadows on the wall, and these provided the photograph with the sense of permanence and change I wanted to express.
Think about the best way to shoot your subjects before actually doing so
Composing your shots doesn’t mean that you have to spend four to five weeks agonizing over how best to shoot your subjects. It simply means thinking about how best to shoot your subjects before actually doing so. The picture above, for example. The students were standing up, so I had focused on them at normal eye level point of view. They suddenly dropped down to the ground, and I instinctively dropped down too, on one knee. But then I knew that from such a viewpoint, I would only be able to shoot the girls in front; they would fill up the viewfinder, hiding from view the students behind them. I immediately stood up and took this shot from a now high angle point of view. All these took place in a matter of seconds. Dynamic Symmetry: composition, geometry, and hidden patterns
Remember our discussion on the Rule of Thirds? The ways by which you place the elements of your image in any of the four intersecting points can create a variety of looks for the final picture. If you want a balanced look for your picture, for example, you have to place the elements at diagonally opposite intersections, like in the picture above of the boy and girl on the grass (where the students are at the upper left hand corner and the out-of-focus foliage is at the opposite right hand corner of the photograph).
Henri Cartier Bresson, considered as the father of photojournalism (he died two or three years ago), once said that in every good picture, there is a hidden geometric pattern. To form a triangle, for example, you can place certain elements of your image at or near any three of the intersecting points. For example, can you see the triangle in the picture above? The student who’s lying prostrate on the ground at the lower left hand and the bottle form the base of the triangle, with the apex being the head of the student in the middle, background area of the picture.
Okay now, what geometric patterns can be seen in the pictures below? Come on now, guys, don’t disappoint your Lolo Henri!
Classically-trained painters often look down on the Rule of Thirds because it uses only horizontal and vertical lines and excludes diagonal lines. Instead, these painters use what is called “dynamic symmetry,” “armature of the 1.5 rectangle,” or “hidden geometry of painters.” As you can watch from the two videos below featuring the photographs of Henri Cartier Bresson, dynamic symmetry can be used in photography.
Dynamic Symmetry, Composition and Henri Cartier Bresson - Part 1 of 2
Dynamic Symmetry, Composition and Henri Cartier Bresson - Part 2 of 2
Dynamic Symmetry: Adding Lines to Fit Your Needs [Composition Tips] (2018) by Tavis Leaf Glover
Other ways of composing your shots
Besides placing your subject in the dead center of your picture, following the Rule of Thirds, and looking for hidden geometric patterns, there are several other ways of composing the various elements of your subject into an aesthetically pleasing image.
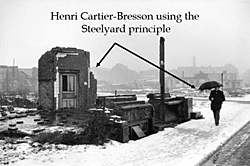
1. Steelyard Principle (From “The Art of Composition: A Dynamic Symmetry User’s Guide for the Modern Artist” v.5.8): “When the subject of a picture is on one side of the middle, it must be close to a pivot point. If it departs from the center, it must be balanced by a small weight element on the other side to create a visual balance.”
“In every composition, the eye will be first drawn to a central point of interest, which may be on one side of the image, then proceed to scan the opposite side looking for another element to receive it. If there isn't any object on the other end, it will give the viewer a feeling of imbalance. Artists that use the Rule of Thirds grid for composition should take note of the steelyard principle because the Rule of Thirds pulls the subject away from the center and off to one side. For this reason, it's easy to create imbalances in a picture.”
Visual balance
In the picture above, the building is my main subject while the three girls on the lower right hand corner serve to balance things out. Without them, the photograph would look terribly out of balance; the left hand side would appear much heavier than the right hand side. While looking at the building through the viewfinder, out of the corner of my eye, I saw these three girls walking towards me. When they were just in the right spot, I took the picture.
(Please notice that the building appears to be falling off towards the background. This is known as the “keystoning effect.” The reason for this is that the film plane and the subject plane are not parallel. More on this later, I promise.)
Balance by tone
Remember our discussion of tone? In the picture above, I composed the shot by balancing the image, with the girls in black on the left side of the frame balanced by the solitary guy in white on the right hand side.
2. Place vertical elements against horizontal elements, or vice-versa
With the picture above, my yearbook staffer makes friends with the statue of Amang Rodriguez. Here, I composed the shot byplacing vertical shapes (my student and the statue) against a background made up of horizontal lines.
3. Contrast one object in sharp focus with another object that is out of focus
Speaking of contrast, you can also compose your shot by placing together one object sharply in focus and another that is out of focus(in the picture above, the bottle in the foreground is in focus while the students in the background are slightly out of focus).
4. Using linear perspective
Remember our discussion of linear perspective? You can compose your shots keeping in mind the effect of linear perspective, that is, elements located at different positions relative to the camera will be recorded as being of different sizes, although they may actually be of the same size.
In the first picture above, for example, the girl with the pig tails in the foreground is actually the smallest among the performers, but because of her position, she seems to be the tallest. In the second picture, the students at the foreground, meditating on the roof of a three story building, seem to dwarf the other students (in the middle of the frame) who are farther away from the camera.
5. Using the picture diagonal (Baroque diagonal and sinister diagonal)
Another way of composing your shots is to place the most important elements of your image along the “picture diagonal,” as in the picture above. If you draw mentally a diagonal line stretching from the lower right hand corner up to the upper right hand corner, you will notice that the guy’s left hand, his body and face and his right hand all fall along the diagonal line. (In Dynamic Symmetry, this is called the “sinister diagonal.”
The picture diagonal can also be placed from the lower left hand corner stretching up to the upper right hand corner (in Dynamic Symmetry, this is called the “baroque diagonal,” similar to the picture above of my cute nephew JR who looks like me. Hey, what can I say? Cuteness is in our genes!
Dutch angle or Dutch tilt
From Wikipedia: The Dutch angle, also known as Dutch tilt, canted angle, or oblique angle, is a type of camera shot where the camera is set at an angle on its roll axis so that the shot is composed with vertical lines at an angle to the side of the frame, or so that the horizon line of the shot is not parallel with the bottom of the camera frame. This produces a viewpoint akin to tilting one's head to the side.
In cinematography, the Dutch angle is one of many cinematic techniques often used to portray psychological uneasiness or tension in the subject being filmed.
Dutch angles are frequently used by film directors who have a background in the visual arts, such as Tim Burton (in Edward Scissorhands and Ed Wood), and Terry Gilliam (in Brazil, The Fisher King, 12 Monkeys, Fear and Loathing in Las Vegas and Tideland) to represent madness, disorientation, or drug psychosis. In his Evil Dead trilogy, Sam Raimi used Dutch angles to show that a character had become possessed.
The Golden Ratio Vs. The Rule of Thirds | The Initiative Pro
Breaking the rules to get better photographs
Following the techniques of composition in shooting your subjects generally yields good photographs. But these are not meant to be straitjackets to stifle your creativity. Never be afraid of breaking the rules when doing so would create “better” pictures. Always be aware of the possibilities that the subject presents to you, and never be afraid to explore all the creative potentials.
I don’t know if you have ever seen martial arts superstar Bruce Lee’s final movie, “The Game of Death.” He was able to shoot only the last 15 minutes of the movie before he died. The climax occurs in a pagoda where he meets several opponents coming from different martial arts styles. He first meets a Hapkido master, then a weapons expert played by Filipino Dan Inosanto, and finally he meets NBA legend Kareem Abdul Jabbar who represented the “Unknown Style” of fighting. In each encounter, Bruce Lee had to forget his set training and adapt his fighting techniques to the situation he found himself up against.
Each subject presents unique possibilities
The same thing may be said of photography. Don’t be bound by a “style” which you may have been taught or trained in. Each subject presents unique possibilities. Let the subject itself decide how you’re going to shoot it! Let’s say you have always used a telephoto lens; maybe the subject you’re shooting now calls for a wide angle lens. Maybe, you’ve always liked blurred backgrounds but your subject right now would be better with foreground blur ...
For example, Annie Leibovitz is the best portrait and editorial photographer in the world, ranking number 2 in American Photo’s 1996 survey of the 100 most important people in photography. Did you know she once asked Olympic hero Carl Lewis to wear high heels for a photo project? She had always worked in the studio with several assistants, and with lots of lights, reflectors and other equipment. In 1993, however, she went alone to Sarajevo, Bosnia Herzegovina which was then experiencing a civil war along ethnic, religious and political lines. She shot ordinary men and women using only available light.
(Using camera flash in a war zone is extremely dangerous. If you and your subjects are in hiding, using the flash could give away your position. Worse, the flash of light could be mistaken as coming from the muzzle of a gun, and that could unwittingly invite retaliatory gunfire from the combatants. We will discuss using the camera flash later on. In the meantime, try to find a DVD of the movie “Flowers for Harrison.” It’s a powerful, gut wrenching, for adults only, movie about photographers in the midst of the Bosnian civil war.)
Ways to improve your composition skills
1. Practice picture composition by looking at your subjects through the viewfinder, without actually shooting.
2. Look at your subjects through the viewfinder and shoot them, without any film on your camera. If you’re using a digital camera, then it’s okay to shoot your subjects. You can simply erase your files later on.
3. Do it in the mind’s eye; with only your eyes, your imagination, visualize how your subject would look on film, in print, or in the computer screen (that is, if you’re into digital photography and placing your pictures on the Internet).
4. Do it the way movie directors sometimes do. Use both hands to frame your subject and to visualize how your subject will look on film, print or the computer screen. But don’t do this while you’re in the mall, okay?
Be a better writer or editor through StyleWriter 4: this software checks 10,000 words in 12 seconds for hundreds of style and English usage issues like wordy and complex sentences, passive voice, nominalization, jargon, clichés, readability, spelling, etc.
StyleWriter 4 graphs your style and sentence variety, and identifies your writing habits to give an instant view of your writing. You can learn to adjust your writing style to suit your audience and task. You can learn, for example, the writing style of Newsweek, Time, The Economist, and Scientific American.
StyleWriter 4 is widely used in the US federal government (for example, the Environmental Protection Agency). It can be used by educators, students, and professionals in various fields - business, law, social or physical science, medicine, nursing, engineering, public relations, human resources, journalism, accounting, etc. Download your free 14-day trial copy now.
Jughead is that lazy but lovable character in the cartoon strip “Archie.” One time, to impress other people, he suddenly takes up painting. Reggie passes by and Jughead asks him, “I want to give this painting more depth! Any suggestions?” Reggie, turned off by Jughead’s pretentiousness replies, “Yeah, throw your painting into the ocean!”
As we have discussed before, a photograph is two-dimensional, with width and height but no depth. Oftentimes, when we look at our pictures, they look so disappointingly different from what we saw with our eyes. The primary reason for this is that we have failed to adequately and deliberately play up the illusion of depth in our pictures.
Remember that our eyes and the camera see things differently. As Galen Rowell once said in an interview, “film is a foreign language.” ( Rowell is a self-taught photographer now considered as America’s foremost scenic photographer and writer.) What he’s saying is that we’ve got to learn the nuances of film, of photography, in order to come up with better photographs. Incidentally, Rowell was an auto-mechanic before he took up photography. Great career change, huh?
Ways to create depth in photographs
Besides throwing your pictures into the ocean, there are several other ways to create and more adequately convey the illusion of depth in your pictures. These are:
converging lines
selective or differential focusing
sidelighting or backlighting
atmospheric haze
contrast of same-sized objects
natural frames
overlapping objects or forms
diminishing detail
the difference in the intensity of tones or colors
Converging lines
In the picture below, I used natural frames, converging lines and difference in tones to convey depth. I used the roof of the open canteen where I was and the ground to frame the building which was my main subject. Since I took my exposure from the flagpole area, the roof and the ground were recorded totally black (while the rest of the image shows various shades of gray. From my oblique point of view, the edge of the roof, the ground and the iron fence seem to be converging towards the vanishing point at the left side of the picture.
Difference in tone; diminishing details
Remember our discussion of tone? Well, photographs with a full tonal range from deep blacks to pure whites, with varying shades of gray, can convey depth better than photographs with low contrast.
I took the picture above way, way back in 1986. Some of you may not have been born yet at that time! The red bloomers and pink flowers on the foreground look much deeper or saturated in color and more detailed than the bloomers and flowers in the background. The differences in the intensity of the colors and the diminishing details from the foreground to the background both help convey depth.
Selective or differential focusing
The picture above has a blurred background because of the shallow depth of field (we will discuss lens openings later on). Through the use of differential focusing or selective focusing, the student-actress and actor both seem “separated” from their backgrounds. The students seem to have been simply cut out with scissors and then pasted on the background. (Note: See the discussion below on rack focus.)
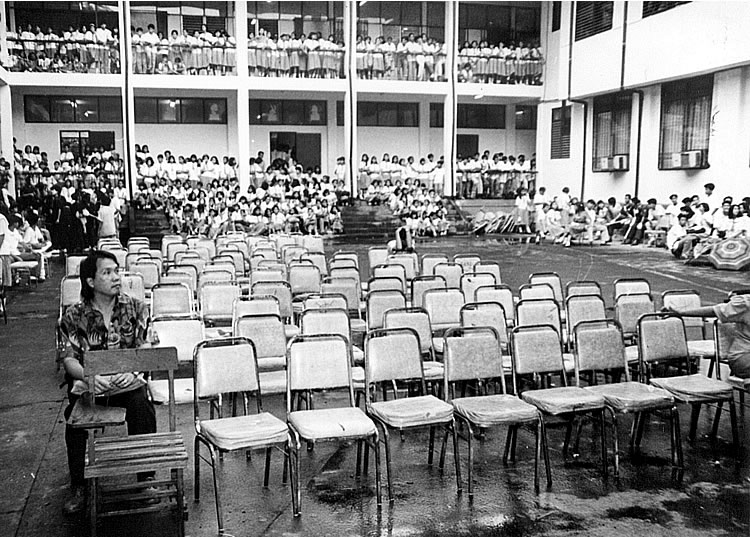
When one object appears larger than other objects which may be of the same size, the larger object is perceived by our minds as being closer. The teacher on the left corner of the picture above appears larger than the solitary guy in the middle who’s covering his head from the rain (can you pick him out?) and the students in the background. Notice also that the chairs are all the same size but those in the foreground look larger than those in the background. The contrast creates the sense of depth. With the picture above, the student sitting on the foreground area appears larger than the boy walking past him, the female students in the background, and the statue framed by the tree in the middle. The student in the foreground is therefore perceived by our minds as being closer.
Atmospheric haze
Remember our discussion on atmospheric haze? Distant subjects appear lighter in tone and less distinct in appearance than nearby subjects. One technique that professional photographers use is to provide so-called “distance cues” or “foreground interest.” With distance cues, you have to provide the viewer some guide to differentiate the foreground, middle ground and the background. (We will discuss later on what is known as false attachment.) These guides will provide not only the illusion of depth but also a sense of scale. With foreground interest, it is common to place persons (like the students playing in the athletic oval in picture above) or other objects in the foreground to provide depth and scale.
Sidelighting
Sidelighting (as in the picture below) creates depth by “separating” the subject from the background and by providing what photographers call “modeling” or a three dimensional effect.
Overlapping objects or forms
Our minds have been conditioned to think that objects hidden from view are farther away, while those which hide them from view are perceived as being nearer.When objects or forms (like the girls and cadets in the picture above) overlap one another, the sense of depth is thus created. Why? Because we can’t see through these objects. We don’t have X-ray vision like Superman, or that teenaged protagonist in National Artist Nick Joaquin’s short story “Candido’s Apocalypse” who acquires the ability to see through clothes, flesh and bones and the human spirit, in his quest for God.
Rack focus (selective or differential focusing as used in cinematography)
Band-Maid is an all-female Japanese band (formed in 2013) that’s considered as one of the best rock bands in the world today. The band combines genres such as rock (hard, progressive, punk), metal, pop, blues, and jazz. Examples of their rock-jazz-blues songs are “Manners,”“Wonderland,” and “Bubble.” For the band’s softer side, listen to “About Us” and to acoustic songs “Puzzle,”“Anemone,”“Smile,” and “Catharsis.”
“Dice” and “Hate?” at Lollapalooza 2023
“Don’t You Tell Me” fan cam video (lead guitar vs. bass from 2:21 to 3:41); watch official MV.
Band-Maid’s B-sides are also excellent; for example, “Hide and Seek” (fan cam video; listen to the bass and lead guitar).
Do you love great basslines? Listen to “Yuragu” where the great bassline leads to an explosive lead guitar solo (2:19 and 3:06 marks in the fan cam video below; 3:03 and 5:27 in the reaction video, with the lead guitar solo at 5:39 mark).
Free seminars on photojournalism, journalism, science/technology writing, and English proficiency
For Metro Manila and Rizal Province schools only; for more information, contact me at gtgalacio@yahoo.com or 0927-798-3138.
Photojournalism (23): Composition: Decide first what theme, emotion, idea or concept you want to convey; Think about the best way to shoot your subjects before actually doing so; Every good picture has a hidden geometric pattern; Other ways of composing your shots: Visual balance; Place vertical elements against horizontal elements, or vice-versa; Contrast one object in sharp focus with another object that is out of focus; Using linear perspective; Balance by tone; Using the picture diagonal; Breaking the rules to get better photographs; Each subject presents unique possibilities; Ways to improve your composition skills
Have regular hours for work and play; make each day both useful and pleasant, and prove that you understand the worth of time by employing it well. Then youth will be delightful, old age will bring few regrets, and life will become a beautiful success.
Louisa May Alcott (1832-1888)
Marital infidelity: causes, consequences and conclusions; Mediation not allowed in domestic violence cases (with apologies to Pia Guanio); Why Marriages Fail: He said, She said; Transformers: Why do persistent suitors become passive husbands? How to save your marriage alone; All about women; Why do men think the things they think, say the things they say, and do the things they do? Surviving marital infidelity; Legal lessong from Willie Revillame and Liz Amoro; Marriage: The Ultimate Fighting Championship; Boundaries in marriage; and other articles
Amy Perez case: psychological incapacity in declaring a marriage null and void; Adultery, concubinage and psychological violence; Can a mother be deprived of custody of her child? Can an unwed mother avail of the benefits of the Solo Parents Welfare Act? Divorce obtained abroad by a Filipino not recognized here; How to disinherit your spouse; Support for abandoned woman and family; The "Battered Woman Syndrome" as defense; The right of a divorced Filipino spouse to remarry under Article 26 of the Family Code; What happens in an annulment case if the respondent fails to file an Answer? RA 9262 Anti-Violence Against Women and their Children Act of 2004; and other articles


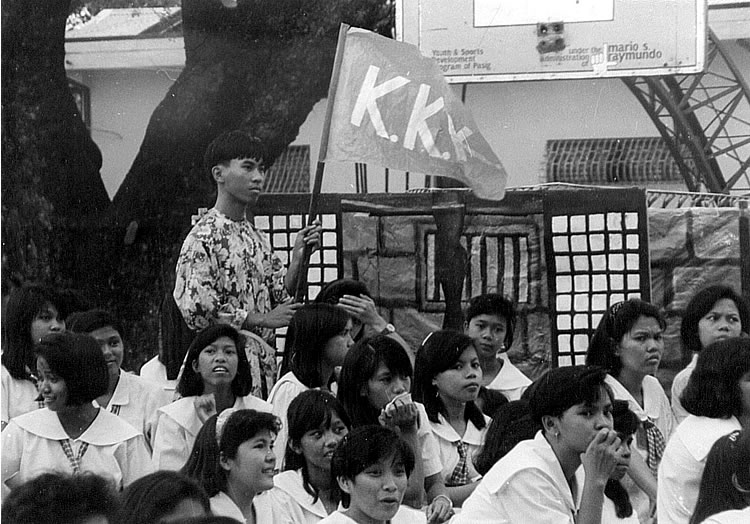 Who knows, you might be able to shoot an interesting spectator like this Katipunero in the picture above? Notice that he’s the only guy in the picture. You might also be able to shoot a girl, watching from the sidelines, who has too much make-up, as in the picture below.


 Juxtaposition
 Point pictures; fillers
 Sequence shots