Sunday, January 27, 2008

Photojournalism (40): Where do we go from here?

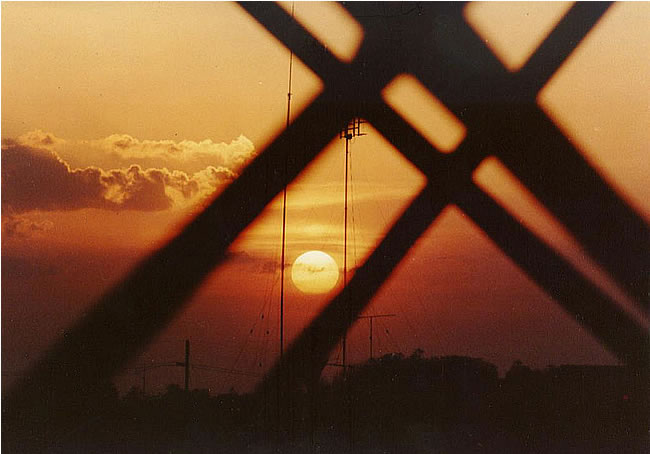
I took this picture 1997 or 1998 along the floodway in Pasig; by playing around with the filtration settings, I was able to come with this dramatic shot of the lights along the floodway; I was in the middle of the Legaspi Bridge at around 7 PM, and I used my beloved Canon AE-1 Program camera with a Vivitar 28-210 mm zoom lens; photo by Atty. Galacio Remember the 1990’s movie “Jerry Maguire” starring Tom Cruise and Cuba (Show me the money!) Gooding Jr.? After Tom’s character gets fired from the sports management company, he desperately tries to convince other employees to come along with him to form another company. But, besides the goldfish, the only one who responds to his call is the lovestruck accountant, played by the absolutely! gorgeous! Reneé Zellwegger! (If National Artist for Literature José Garcia Villa had his “comma, comma” poems, I also have my own “exclamation point poetic device,” okay?) Anyway, what did Tom Cruise say? “This could be the start of something fun!”

Free street photography e-books
by Thomas Leuthard:

Going Candid - An unorthodox
approach to Street Photography


Collecting Souls - What Street
Photography means to me


Street Faces – The Art of Candid
Street Portraiture
This series is merely an introduction to photojournalism, and I sincerely hope that by browsing the 39-plus articles, you’ve been inspired to learn more about photography on your own. This could really be the start of something fun for you! A lot of people, however, will surely discourage you from pursuing your interest in photography by saying that it’s a very! expensive! hobby! (Okay, okay, enough of this José Garcia Villa wannabe stuff!)

Photography is indeed a hobby to a lot of people, but it is also a bread and butter profession for others, a lifelong pursuit for some, and a deliberately chosen means of self-expression for a very few. Whatever photography may be to you, certain sacrifices have to be made if you want to excel in this art, or in any art form, for that matter. N.V.M. Gonzales, a literary giant among Filipinos (my favorite among his stories is “Blue Skull and Dark Palms”), during his teenaged years, walked five kilometers a day in getting to and from the town hall that had the only typewriter in that place. Talk about dedication and sacrifice!

But “expensive” need not be the word to describe photography. You can always use “re-loaded” film, which costs less than the regular films. Or, you can hone your skills by volunteering to take pictures of birthdays or programs where other people naturally would have to shoulder the expenses. Of course, with the advent of digital photography, there’s no need to even buy film. You just have to shoot your pictures, download your images through your computer’s USB cable, and you’re ready to shoot again!

In terms of SLR cameras, you can find relatively inexpensive manual camera models on the market. Or you can choose to buy a second hand camera ... Me, I really started learning about photography by borrowing the camera of my staffer, but you already know the story from the Introduction to this series, right? Right!

Photography is an art form that is accessible for all. You don’t need formal studies in order to be a good photographer. As Ernst Haas said, “If art is aristocratic, then photography is its democratic voice.” This statement however is not meant to disparage photography as an art form. (“Disparage” - I love these high sounding words!) Anyone can learn photography but not everyone can be a good photographer. There aren’t that many Vic Valencianos, Lita Puyats, Mandy Navaseros,Toch Arellanos, Vic Sisons, or Ed Santiagos, among us, you know!

http://www.digitalcameraworld.com/2014/02/07/77-photography-techniques-tips-and-tricks-for-taking-pictures-of-anything/The best way to improve yourself as a photographer is to show your pictures to people whose opinion you respect like your teachers, classmates, or the pizza delivery guy! These people, if they’re honest enough, will tell you not only what’s good but more importantly, what’s bad with the photographs you have taken. Avoid people who only say good things about your pictures; they probably just want to borrow money from you! Wig Tysman, a well-known fashion photographer, once said that his best critic is his wife who would lovingly ask him over breakfast, “Were you sane when you took this picture?” She’s my kind of woman!

Richard Avedon, circa 1996, is the most influential photographer in the world, ranking number one in an American Photo survey of the 100 most important people in photography. By the way, model Kate Moss, along with other super models like Cindy Crawford, was ranked number 82 in that survey! Anyway, not very many people know that Avedon learned about photography when, as a merchant marine at age 19, he was given the job of shooting ID pictures. Avedon, in the book Evidence 1944-1994, stated, “I must have taken pictures of maybe one hundred thousand baffled faces before it occurred to me I was becoming a photographer.” From IDs to fashion and portraits - way to go, Mr. Avedon!

Sebastião Salgado, an economist considered as the world’s best photojournalist, practically didn’t know anything about photography until his wife, Leila, an architect, gave him a camera as a gift. The first time he looked through the viewfinder, however, Salgado was hooked on photography! Boy, I wish I had a wife who will give me a camera! I mean, I mean, I mean, I mean, boy, I wish I had a wife!

By whatever way you fall in love with photography, OR if you do have the talent for it, use it, nurture it, share it! Starting now! As Julia Roberts’s best friend in the movie “My Best Friend’s Wedding” says, “If you really love someone, you’ve got to say it, out loud! Otherwise, the moment will just pass you by.” Me, as I mentioned in the Introduction to this series, I fell in love with photography when I fell in love with a beautiful actress named, what’s her name again? Beth Tamayo? No, already spoken for! Sandra Bullock? No, too intense! Ally Macbeal? No, too weird! Buffy, the really cute Vampire Slayer? No, no, too violent! Julia Roberts? Wow! Cameron Diaz? Wow! Oh, yes, now I remember, Murphy Brown! Yes!

A spark of the divine fire

Martha Foley’s short story “One With Shakespeare” chronicles a young girl’s exquisite discovery of her talent for writing. Through the encouragement of her high school teacher, the girl realizes that just like Shakespeare, she also had that creative potential, that “spark of the divine fire.” She begins to savor the emotions, the expressions, the ideas her words could bring forth. She begins to learn how to create memorable images in the mind’s eye through words. Looking out the windows of the library, she sees the flower filled trellis and her mind is filled with images of “black sentinels against the sky.”

Perhaps your talent isn’t in photography but in creative writing or journalism. But this series on photojournalism can still help you through an activity known as “writing through seeing.” Sometimes, you run out of ideas or topics to write about. What you can do is to look at the pictures in this series, and use them as your inspiration, as starting points for writing descriptions, narration, expositions, dialogues, short stories, etc.

I took this picture 1990 or 1991 using my favorite Kodak Tri-X black and white film. Using Kodak's Create-A-Print machine, I came up with different colored variations by playing around with the filtration settings; photo by Atty. Galacio
Silhouette, natural frames and rule of thirds; photo by Atty. GalacioFor example, you can write a description of your feelings as you look at the solitary branch against the sunset above. Write about the glorious sunsets in Boracay when you went there last summer. Write about how you felt, what you thought about as you and your family spent time together along Baywalk. Write about how you felt getting turned down for the tenth time by the same girl (ouch!)

Creative writing through seeing; vertical format; photo by Atty. Galacio You can use the picture above of the guy up on a tree to learn how to write dialogue; notice that the girl with a white T-shirt is looking up at the guy, and there’s a heart-shaped piece of paper with the words “Happy Valentine” on the tree.

In my 12 years of teaching, two of the best student writers I ever had the pleasure of teaching were Mylah Reyes-Roque (from Rizal High School in Pasig, Class ’87; she recently won a UNICEF award for her Newsbreak magazine article on child prisoners), and Cyrille Cucio from Quezon City Science High School Class ‘84. But Cyrille went into medicine rather than journalism or creative writing. (She is now working in a New York City hospital.) When we met several years after high school, I told Cyrille that I was disappointed with her because she wasted her talent for writing. Well, writing’s loss is medicine’s gain, I suppose... or she could be the next Arturo B. Rotor of Philippine literature! In case you’ve forgotten, Rotor, a medical doctor, wrote the classic short story “Zita.”

Whatever your talent may be, nurture it, share it. That talent, that "spark of the divine fire" is a gift from God.

Tuesday, January 01, 2008

“The Rose”

Where do we go from here? 2007 is over and we’re on the first day of 2008. We don’t know what this year will bring as these verses tell us:

Joshua 3:4 “that ye may know the way by which ye must go: for ye have not passed this way heretofore.”

James 14-15 “Whereas ye know not what shall be on the morrow. For what is your life? It is even a vapour, that appeareth for a little time, and then vanisheth away. For that ye ought to say, If the Lord will, we shall live, and do this, or that.”
As a way of saying thanks for all of you who browsed my blogs and websites (Legal Issues and Family Matters; Better English for Filipinos; and English for Asians and Africans) this year, please let me share with you this story entitled simply “The Rose”. Max Lucado popularized this story in his 1992 book “And The Angels Were Silent”. It surfaced in the Internet sometime in 1996 and has since then achieved the status of an urban legend. It has even become sermon illustrations (please see for example “Easter After Tremors: The Call to Love” by Mark Daniels).

Most reproductions of this story (whether in print or the Internet) state either that the story’s author is unknown or that it originally came from Max Lucado. However, the real author is someone named S. I. Kishor and the story was first published in Collier’s magazine sometime in 1943. In Lucado’s book, it appeared without attribution and was entitled “The People with the Roses.’ In the 1996 Canfield and Hansen collection “A 3rd Serving of Chicken Soup for the Soul”, S.I. Kishor was correctly identified as the author. Be that as it may, “The Rose” has become a runaway favorite among Internet users.

“The Rose” by S. I. Kishor

John Blanchard stood up from the bench, straightened his Army uniform, and studied the crowd of people making their way through Grand Central Station. He looked for the girl whose heart he knew, but whose face he didn't, the girl with the rose.

His interest in her had begun thirteen months before in a Florida library. Taking a book off the shelf he found himself intrigued, not with the words of the book, but with the notes penciled in the margin. The soft handwriting reflected a thoughtful soul and insightful mind. In the front of the book, he discovered the previous owner's name, Miss Hollis Maynell. With time and effort he located her address. She lived in New York City. He wrote her a letter introducing himself and inviting her to correspond. The next day he was shipped overseas for service in World War II.

During the next year and one month the two grew to know each other through the mail. Each letter was a seed falling on a fertile heart. A romance was budding. Blanchard requested a photograph, but she refused. She felt that if he really cared, it wouldn’t matter what she looked like.

When the day finally came for him to return from Europe, they scheduled their first meeting - 7:00 PM at the Grand Central Station in New York. “You'll recognize me,” she wrote, “by the red rose I'll be wearing on my lapel.”

So at 7:00 he was in the station looking for a girl whose heart he loved, but whose face he'd never seen. I'll let Mr. Blanchard tell you what happened:

A young woman was coming toward me, her figure long and slim. Her blonde hair lay back in curls from her delicate ears; her eyes were blue as flowers. Her lips and chin had a gentle firmness, and in her pale green suit she was like springtime come alive. I started toward her, entirely forgetting to notice that she was not wearing a rose.

As I moved, a small, provocative smile curved her lips. “Going my way, sailor?” she murmured. Almost uncontrollably I made one step closer to her, and then I saw Hollis Maynell. She was standing almost directly behind the girl. A woman well past 40, she had graying hair tucked under a worn hat. She was more than plump, her thick-ankled feet thrust into low-heeled shoes.

The girl in the green suit was walking quickly away. I felt as though I was split in two, so keen was my desire to follow her, and yet so deep was my longing for the woman whose spirit had truly companioned me and upheld my own. And there she stood. Her pale, plump face was gentle and sensible, her gray eyes had a warm and kindly twinkle. I did not hesitate. My fingers gripped the small worn blue leather copy of the book that was to identify me to her.

This would not be love, but it would be something precious, something perhaps even better than love, a friendship for which I had been and must ever be grateful. I squared my shoulders and saluted and held out the book to the woman, even though while I spoke I felt choked by the bitterness of my disappointment. “I'm Lieutenant John Blanchard, and you must be Miss Maynell. I am so glad you could meet me; may I take you to dinner?”

The woman's face broadened into a tolerant smile. “I don't know what this is about, son,” she answered, “but the young lady in the green suit who just went by, she begged me to wear this rose on my coat. And she said if you were to ask me out to dinner, I should go and tell you that she is waiting for you in the big restaurant across the street. She said it was some kind of test!”

It's not difficult to understand and admire Miss Maynell's wisdom. The true nature of a heart is seen in its response to the unattractive.

Happy New Year!

Thursday, December 27, 2007

Creative writing: Picture no. 7

The joys of photography


Silhouette, natural frames and rule of thirds; photo by Atty. Galacio
World literature tells us the tragic story of Faust who vowed to bargain away his soul if he could find one perfect moment of happiness. He would eternally forfeit his soul if upon finding that one perfect moment of happiness, he would utter the words, “Stay, you are so beautiful.” He couldn’t find that happiness in his relationships, in society, in achievements, but he did find it in a small village by the sea, with the sun setting down, and mothers calling upon their small children to come back to their homes. In the simple joys of these village folks, Faust found his one perfect moment of happiness. At last, he said the words, “Stay, you are so beautiful!” and his soul was eternally forfeited.

Photography has the power to capture not only our perfect moments of love and happiness, but also searing images of cruelty and poverty. It has the power to preserve in a rectangular frame the beauty of a thousand sunsets, the joys of parents seeing their child just learning how to walk on its own, the sublime happiness of students graduating after four years of hard work and sacrifice.

Unlike Faust, however, we do not have to bargain away our souls in order to capture our perfect moments of happiness. We only have to pick up our cameras, look at the world through the viewfinder, and as life passes before our lenses, capture these perfect moments of happiness on film, as we say in our hearts and minds, “Stay, you are so beautiful!”

Wednesday, December 26, 2007

Creative writing: Picture no. 6


I hate it when schooldays are over. There’s a dreariness in the air that depresses me. Even the rooms that once were filled with laughter are now empty and bare, the fine dust gathering on the wooden chairs, the windows shutting out the light from the dying sun.

Outside the once green grass now turns to deep brown in the parched ground, the trees bare of any leaves, their twisted black branches reaching upwards toward the sky in vain supplication for a little rain. The wind blows and creates swirling clouds of dust that sweep the school grounds and the empty hallways that once echoed the sounds of hurrying feet and young, excited voices.

School days are over, summer is here.

We’ve said our final goodbyes to our dear friends a thousand times, not really wanting each goodbye to be the last and final sad farewell. We cling to our friends, we hold hands tightly as we walk around the school one final time; we visit the rooms that were once our safe and secure refuge from the harshness of life.

We go through the paces of graduation practices, and laugh at the silly mistakes we make. But deep inside us, we feel a cold hand clutching our hearts, knowing that each day brings us closer to the moment when separation from our dear friends becomes inevitable, a moment steeped in profound sadness and absolute finality.

We close our eyes and hope that time can stand still; we will hold this day like a precious diamond in our hands, hold it up and reflect upon its exquisite beauty. If only time can stand still, we will forever be happy, together …

ALL ETERNITY FROZEN IN A SINGLE MOMENT OF YOUTH.

Tuesday, December 25, 2007

Season’s greetings

Click here to know what this season is all about

Monday, December 24, 2007

Creative writing: Pictures 1 to 5

Okay, now that you know how creative writing through seeing works, why don't you try out your writing skills with these pictures?

Photo by Atty. Gerry T. Galacio; all rights reserved
Picture no. 1 (reflections, nostalgia)

Photo by Atty. Gerry T. Galacio; all rights reserved
Picture no. 2 (circles, a sense of belonging)

Photo by Atty. Gerry T. Galacio; all rights reserved
Picture no. 3 (street children, simple joys)

Photo by Atty. Gerry T. Galacio; all rights reserved
Picture no. 4 (sunset, golden hours, innocence of childhood)

Photo by Atty. Gerry T. Galacio; all rights reserved
Picture no. 5 (former Main Building of Rizal High School
in the Philippines; credited in the 1990's by the Guinness
Book of World Records as the world's biggest high school,
with enrollment reaching 26,000 students at one point)

Friday, December 14, 2007

Photojournalism (39): Correct exposure

Free cheat sheets:

The 3 Elements of Exposure

Manual Photography Cheat Sheet

Mastering manual exposure with an SLR camera

Beginner’s free printable cheat sheet: Introducing ISO, shutter speed and aperture and how they are manipulated to give correct exposure

Night exposure guide
Aperture and shutter speed combinations, also known as the ugliest topic in photography!

What is the basic nature of photography as a medium of artistic expression? In 1839, when William Henry Fox Talbot presented the process of photography to the Royal Society in London, he described the image he produced as having been “copied from nature,” that is, it looked exactly like the way it was in real life. Basically that’s what photography is all about – recording in film or in memory sticks (if you’re into digital photography) what exists out there in the empirical world.

Perhaps, this is the reason why some painters and sculptors look down on photographers. But as you may know by now, good photographs are not just record shots of what exists out there. Photography is definitely not an art form secondary to painting and other visual arts, and we should not feel inferior to those who draw or paint. Photographers are artists in the fullest sense of the word. As the title for an André Kertész biography puts it, photographers are “poets with a camera.” As Jacques Lipchitz said, “Copy nature and you infringe on the work of our Lord. Interpret nature and you are an artist.” Or as Georges Braque stated, “Great art picks up where nature ends.”

(While we’re in the quotation-citing mode, here’s my favorite quotation I made up myself: “Pizza is the best thing to ever happen in human history.”)

What “exposure” means

The term “exposure” means allowing the light to reach or strike the film inside your camera. With single lens reflex (SLR) cameras, exposure involves the following mechanical procedures: you depress the shutter release button; the lens opens to whatever aperture you have set; the mirror flips up out of the way; the focal plane shutter curtains open and close according to the shutter speed you have set; the mirror returns to its original position; and the lens is fully open again.

The proper exposure is achieved by the correct combination of shutter speed and lens aperture. The shutter speed controls the duration of the exposure, and the aperture controls the brightness of the image. The shutter speed and the aperture must always work hand in hand. The correct or proper exposure isn’t however a single shutter speed/aperture combination. For example, if the proper exposure for a particular scene or subject is 1/250 sec at f/11, you can achieve the same result by using the combination of 1/125 sec at f/16.

For a more detailed discussion, please refer to the Wikipedia article on “exposure.”

Here are the general rules on exposure:

(1) Bright lighting conditions - use a fast shutter speed and a small aperture;

(2) Dim lighting conditions - use a slow shutter speed and a wide aperture;

(3) The slower the shutter speed, the smaller the aperture should be;

(4) The higher the shutter speed, the bigger the aperture.

The Sunny 16 Rule

You’re shooting a subject that is lighted frontally by direct sunlight; in simpler terms, your subject is facing the sun. What’s the correct shutter speed and lens opening? Simply follow the Sunny 16 rule expressed in the formula - 1/ISO at f/16. Here are the steps:
(1) Set your aperture ring to f/16;

(2) Set your shutter speed dial to whatever speed is closest to your film’s ISO rating; for example, if your film is ISO 100, set your speed at either 1/125 sec or 1/90 sec; if your film is ISO 400, set your speed at 1/500 sec.

(4) Shoot your picture. That’s it. Piece of cake! (or should I say, piece of pizza!)
Overexposure and underexposure

When you hang around professional photographers or serious hobbyists, you will very often hear them talk about “overexposed” and “underexposed” shots.

(1)  A picture is “underexposed” when you use either too fast a shutter speed or too small an aperture. The result is a picture that is too dark, loss of details in the shadow areas and grayish highlights.

(2) A picture is “overexposed” when you use a shutter speed that’s too slow or an aperture that’s too big.

The term “stop” refers to either the aperture or the shutter speed. When you set your lens to an aperture between f/11 and f/16 for example, that’s a half-stop. The phrase “stopping the lens down” simply means setting your lens to the smallest aperture or opening possible under the prevailing lighting conditions.

Errors in setting the shutter speed or aperture could lead either to overexposure or underexposure. “Underexposure” is produced either by too fast a shutter speed or, and results in a picture that is too dark, with loss of detail in the shadows and gray instead of white highlights. “Overexposure” on the other hand, may be produced either by a shutter speed that’s too slow or by an aperture that’s too big. Overexposed pictures are too light, with grayish shadows and “bleached out” highlights.

Slight errors in shutter speed and aperture combinations can be offset when you have your pictures printed, or when you edit your pictures with your photo editing software (I prefer Macromedia Fireworks). It is usually better when pictures are overexposed rather than underexposed. Why? Because it is easier to correct overexposed shots. The subject details may be faint but they’re there and can be easily be brought up in the photo studio.

Difficult exposure conditions


1. Shooting against the light: As a general rule, the sun or your light source must always be behind you (the subject is therefore frontally lit). If the source of light however is behind your subject, you’ll be shooting against the light. Your camera meter will be fooled by the brightness of the situation and your subject will come out too dark. Thus, if you’re shooting portraits, the background will be light and the faces of your subjects will come out too dark.

How do you remedy this situation? Open your lens by one to two stops. If your meter tells you to use f/11, turn your aperture ring to f/8 or f/5.6. Or, if your camera meter tells you to use 1/500 sec, set your shutter speed dial to 1/250 or 1/125 sec.

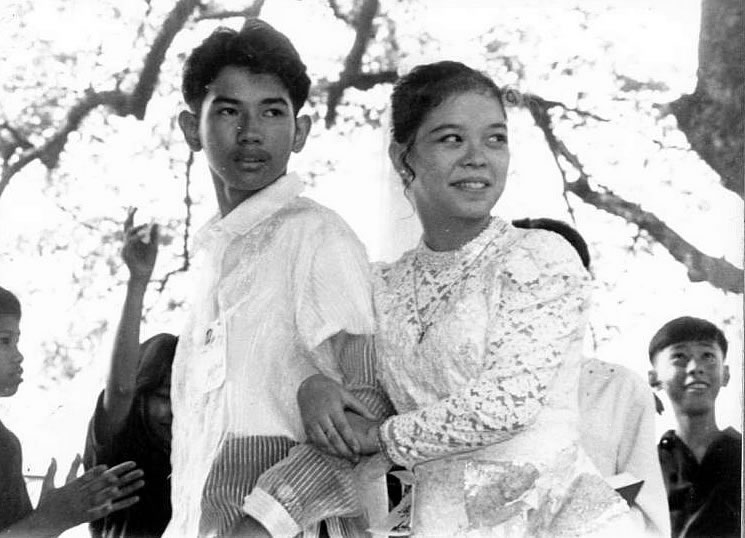
Avoid shooting against the light; Open your lens by one to two stops. If your meter tells you to use f/11, turn your aperture ring to f/8 or f/5.6. Or, if your camera meter tells you to use 1/500 sec, set your shutter speed dial to 1/250 or 1/125 sec.;Rizal High School 1996; photo by Atty. Galacio In the picture above, I had no choice except to shoot my high school students Dindo and Gracie. Why? They were too young to get married. Just kidding! Just kidding! Rewind! Rewind!

Okay, okay, rewind, in the picture above, I had no choice except to shoot my high school students Dindo and Gracie against the light. They were performing on an outdoor stage at 3 in the afternoon. The camera’s light meter, seeing all that background light, called for f/11, so I used f/5.6, giving my subjects two stops more exposure. If I had used f/11, the background would have come out all right but Dindo and Gracie would turn out too dark, their faces totally engulfed in shadows. Their light toned bridal costumes added to the problem on what the correct exposure was, but I didn’t want to go crazy thinking about this. I simply opened up the lens two stops more because of the bright background.

2. Light subject against a dark background, OR a dark subject against a light background: Your SLR camera’s reflected light meter will be fooled by either the brightness or the darkness of the background. Most of us can’t afford to buy a handheld light meter and so we can’t do any incident light reading which is the right solution for these situations. What’s the practical solution? Come very close to your subject so that it more than fills the frame and then measure the light through your camera’s TTL (through the lens) meter.

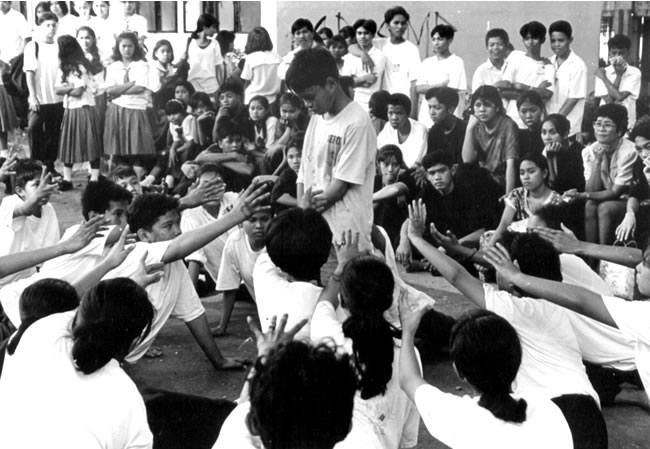
Light subject against a dark background, OR a dark subject against a light background;  Come very close to your subject so that it more than fills the frame and then measure the light through your camera’s TTL (through the lens) meter;photo by Atty. GalacioThese friends in the picture above, wearing dark toned shirts, were standing against a light toned wall. Here’s what to do. Mark your location. Come in close until your subjects’ faces fill up your viewfinder viewfinder. Meter your subjects and set your lens opening or shutter speed accordingly. Move back to your original location. Shoot! (If you’re using a zoom lens, zoom in on your subjects’ faces, meter, set your aperture, zoom out and then shoot.)

As rules of thumb, if your subject is against a bright background, set your camera two stops more than what the TTL meter indicates. If your subject is against a dark background, set your camera one stop less than the meter reading.

3. High lighting contrast: The scene has a higher brightness range than normal film can handle. While our eyes can differentiate objects in a scene with a brightness range of 1:1000, normal film only has a brightness range of about 1:100. Solutions? Use a graduated filter (please see the Wikipedia article on photographic filters) to help you deal with the high contrast, as when you’re shooting landscapes. Or, work with the situation, not against it, by coming up with a silhouette.

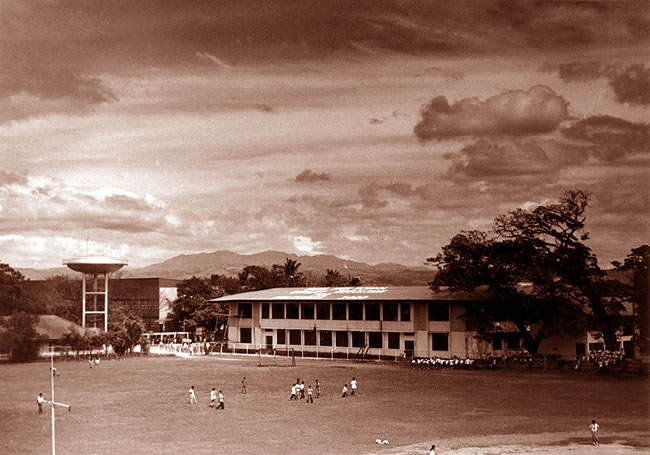
If you base your exposure on the bottom portion of the picture, the sky will be completely burned out, and the clouds won’t record at all on the film. On the other hand, if you meter for the clouds, then the building will turn out too dark. Solution? Average your exposure; if the sky calls for f/16 and the foreground is at f/8, use f/11 as your opening; Rizal High School 1990; photo by Atty. Galacio
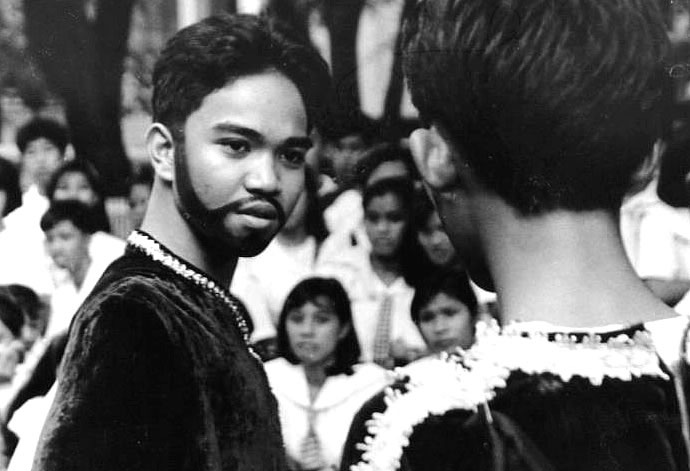
Rizal High school 1995; photo by Atty. Galacio The two pictures above are situations that call for “averaging” your exposure. In the first picture, if you base your exposure on the bottom portion of the picture, the sky will be completely burned out, and the clouds won’t record at all on the film. On the other hand, if you meter for the clouds, then the building will turn out too dark. Solution? Average your exposure; if the sky calls for f/16 and the foreground is at f/8, use f/11 as your opening.

In the second picture above, where should you base your exposure - on Richard, the bearded guy on the left, or on the guy on the right who obviously has used too much skin whitener?

If you meter for Richard, he’ll come out okay but the guy on the right will turn out too light, with no details on his face or shirt. But if you meter for him instead, Richard will turn out too dark. Solution? Average your exposure.

Set your aperture one stop wider than what your camera meter indicates. If your meter calls for f/5.6, use f/4. ;photo by Atty. Galacio
Set your aperture one stop wider than what your camera meter indicates. If your meter calls for f/5.6, use f/4. ;photo by Atty. Galacio In the first picture above, the student had a white shirt, white spots all over his hands and forearms, and too much skin whitener on his face. In the second picture above, the students had white shirts and white gloves. In this kind of situation, your camera meter will be over-influenced by all that whiteness. Result? The students’ faces in, and everything else about this student in the first picture, could turn out too dark. Solution? Set your aperture one stop wider than what your camera meter indicates. If your meter calls for f/5.6, use f/4.

When your subjects have predominantly dark tones, use an opening one stop less than the meter reading. If the meter calls for f/8, set your lens to f/11. OR, instead of 1/250, use 1/500 sec. ;photo by Atty. Galacio In the picture above, the students were wearing dark toned shirts and some had gold paint on their faces. If I followed the camera’s meter reading, the shirts will turn out properly exposed but the faces of the students could turn out too light. Solution? When your subjects have predominantly dark tones, use an opening one stop less than the meter reading. If the meter calls for f/8, set your lens to f/11. OR, instead of 1/250, use 1/500 sec.

Bracketing your shots

Bracketing is a technique professional photographers always use. It simply means taking extra pictures with one-half to one stop more exposure, and one-half to one stop less exposure than that indicated by the camera meter. If the reading is f/8, you should take another shot at f/5.6 (more exposure), and another shot at f/11 (less exposure). With some lenses, you can set the lens between apertures (e.g. between f/11 and f/16); that’s a half-stop.

Bracketing is absolutely essential when you’re using slide film. With color negative/color print films, it isn’t necessary since this kind of film has a wide latitude for exposure errors. Errors can be offset during the printing stage, as I mentioned above.

What if you have to maintain your aperture like when you really need the depth of field? In our example, maintain f/8 as your lens opening; if your shutter speed is 1/250 sec, shoot one frame with 1/125 (more exposure), and another at 1/500 sec (less exposure). Some camera models have an auto-bracketing feature; there’s no need to fiddle around with settings!

Photography is a technology-based art form

“From today, painting is dead!” This was the cry of doom and despair by French painter Laroche way back in 1839 when photography was introduced to the world. History has proven him wrong, however; painting is still a flourishing art form. With the advent of personal computers and their revolutionary impact on almost all aspects of life, it seems it’s now the turn of photographers to exclaim, “From today, photography is dead!”

Photography is a technology based art form. Since 1839, it has always been a silver halide based art form, meaning we’ve got to have film in order to have pictures, until today that is. Now, computers and cameras have been fused together to produce film-less digital cameras, and this is the kind of camera most of you are using right now. (Even cellphones now have cameras!) The quality of pictures produced by digital cameras, measured in megapixels, are quite good. With the pictures I have posted in my "Baptist Churches in the Philippines” blog, for example, I shot them all with a Sony 5.1 megapixel digital camera. And I didn’t have to fiddle around with shutter speed and aperture settings; the camera with its automatic functions took care of everything. All I really had to do was to point and shoot.

The camera doesn’t take the picture, you do!


A lot of professional photographers look down on “auto-photography” or what is sometimes called as “decision free” photography. These terms refer to the heavy, oftentimes complete reliance on the automatic features of today’s cameras brought by computers, microchips and electronics.

These photographers feel that relying on automation and electronics is a hindrance to a person’s creativity. They want the best of both world, actually. They value the information, the assistance given by the automatic features of today’s cameras but they also want what is known as “manual override,” that is they want to be able to turn off the camera’s automatic functions and rely on their brains, their experiences, their feelings, their sensibilities. In other words, they don’t want their cameras to take the pictures for them; they want to take the picture themselves.

Or in the words of Richard Avedon, ranked number one in a 1996 survey of photographers and photo editors, “It’s not the camera that makes a good picture but the eye and the mind of the photographer.”

Friday, December 07, 2007

Photojournalism (38): Shutter speed; how to freeze fast-moving subjects

Free articles and cheat sheets from Digital Camera World:

How to shoot fast-moving objects (see the graphic at the bottom portion of this post)

How to take control of your shutter speed for cool effects

Slow shutter speed vs. fast: how to maintain a consistent exposure

3 camera lessons every new photographer should learn

Best shutter speeds for every situation

Free action photography cheat sheet
“Shutter speed” is one of three ways we use to discuss the term “speed” in photography. The two other ways are “lens speed” (the maximum aperture a given lens has) and “film speed” (the measurement of the film’s sensitivity to light).

The shutter is a device used to control the time that light is allowed to act on the film. Besides controlling the duration of the exposure, the shutter more importantly, controls the exact moment the film is exposed to the light.

Like the ISO (International Standards Organization) numbers and the f/numbers (please review the Wikipedia article on photographic lenses), the shutter speeds are a universally adopted series of numbers. The ISO numbers are an index of the film’s sensitivity to light, while the f/numbers, on the other hand, are a measurement of how small or how big the lens opening is.

The shutter speed is the time the shutter remains open, allowing light to hit the film. Measured in fractions of a second, each change in shutter speed setting is considered as one stop (just like apertures or lens openings). The time during which the shutter remains open is controlled either mechanically or electronically.

Notice that on your camera’s shutter speed dial, the numbers do not appear as fractions; only the denominators appear, thus 1/1000 would appear as 1000, 1/125 as 125 and so on. Full seconds (numbers appearing after 1/2 sec) are often indicated by a different color. Remember that shutter speeds are fractions of a second; 1/2000 really means that you take one second and divide it into two thousand parts and then take only one part of that 2,000 parts.

Shutter speed, freezing movement, and light conditions

(1) When you want to freeze the action, as in a shot of a basketball player dunking the ball, a high jump athlete doing the Fosberry Flop, etc, use a fast shutter speed like 1/250 sec. or higher.

(2) When you’re shooting your subject under bright lighting conditions, use a fast shutter speed. A slow shutter speed will allow too much light to reach the film and will consequently overexpose your shot.

(3) When there isn’t much light, as when you’re shooting early morning or late afternoon, or you’re inside a room - use a slow shutter speed like 1/60 sec. or slower. A high shutter speed will restrict the amount of light striking the film and will consequently underexpose your shot.

Remember, however, that you have to consider the aperture or lens opening for the correct exposure.

Freezing movement

When you want to freeze movement, there are factors other than shutter speed that you have to consider: (1) subject distance; (2) focal length of the lens; and (3) direction of the movement.

When using wide angle lenses to shoot subjects which may be far off from you, or moving away from you, you can use slow shutter speeds to freeze the subject. When you are using telephotos, you have to use fast shutter speeds to freeze movement of subjects which are, in Karen Carpenter’s song, close to you.

If the subject is moving away from or towards the camera, you can use 1/60 sec. or slower since the camera senses little movement in this kind of situation.; Rizal High School 1993; photo by Atty. GalacioIf the subject is moving away from or towards the camera (like the boys in the picture above rushing to the venue of the Math Quiz competition), you can use 1/60 sec. or slower since the camera senses little movement in this kind of situation. In sporting events like racing (sports cars, cycling, track and field, etc), position yourself at the corners of the track. Thus way, your subject will be turning towards you and you will be able to use even slow shutter speeds.

If the subject is moving in an oblique way with reference to the camera, use l/125 sec or higher; photo by Atty. Galacio 
If the subject is moving in an oblique way with reference to the camera, like this Tae Kwon Do black belter in the picture above, use l/125 sec or higher.

If the subject is moving across the film plane, you have to use 1/250 sec or higher.; Rizal High School 1992; photo by Atty. Galacio 
If the subject is moving across the film plane, you have to use 1/250 sec or higher. Otherwise, the subject will come out blurred like the boys in the picture above where I used 1/60 sec.

Blur as a means of expressing movement

I could have frozen these guys (in the picture above) in mid-air by using a much higher shutter speed, but sometimes, blur is can express movement better. Speaking of blur, you can create it by either using a slow shutter speed, or by deliberately shaking or jiggling your camera while taking your shots. The end result is, of course, difficult to predict. You could probably mess up a lot of your pictures, but you may also come up with some pretty neat, abstract designs. (By the way, photographer Ernst Haas became famous for his deliberately-blurred pictures.)

http://www.digitalcameraworld.com/2013/05/10/slow-shutter-speed-vs-fast-how-to-maintain-a-consistent-exposure-photography-cheat-sheet/

Flash synchronization speed or the x-synch

On your shutter speed dial, you’ll find the number 60, 90, 125 or 250 (remember that these are really 1/60, 1/90, 1/125 or 1/250th of a second) either marked by a lightning bolt beside it or set in a different color than the other shutter speeds. This number or speed is your camera’s “flash synchronization speed” or simply the “x-synch”.

The x-synch or the flash speed, simply put, is the highest shutter speed you can set on your dial when using your flash. So, if your x-synch is 1/60 sec, do not set your shutter speed dial to a higher number, for example, 1/125 or 1/500 sec. If you do, your pictures will come out with one half of the frame totally black, devoid of any image.

So you can’t use a speed higher than your x-synch. The question is, can you use a speed slower than the x-synch? The answer is yes (if you want more illumination for your subject, that is).

B-setting


Besides numbers, you’ll also find the letter “B” on your camera’s shutter speed dial. The “B” stands for “bulb” and is used when you need exposure times longer than the slowest speed available on your camera. Thus, if your slowest speed is 8 seconds, and you need an exposure time of say, 45 seconds (as when you’re doing night photography), you need to use the B-setting.

Photography’s high sounding-terms

Reciprocity failure, hyperfocal distance, flash synchronization speed, x-synch, B-setting ... photography really has a lot of high sounding terms. Don’t be intimidated however by these terms; there are veteran photographers who may not have heard of these terms and yet, they can create a lot of good pictures.

The point is, don’t go about thinking that you’ll become a better photographer by simply memorizing the definitions. You become better by learning the basics, which includes knowing, not memorizing, what these terms mean and applying them when you go out to shoot. Photography is definitely a hands-on activity! As the late martial arts superstar Bruce Lee once said, no one learns how to swim on dry land. I believe him. I tried! I nearly drowned!

Sunday, December 02, 2007

Photojournalism (37): Depth of field

Free articles and cheat sheets from Digital Camera World:

A layman’s guide to depth of field; how to check and affect sharpness like a pro

Three ways to affect depth of field

How aperture controls depth of field

3 camera lessons every new photographer should learn
 
Aperture: when to go small and when to go wide
Our previous lesson was on lenses and if you were able to browse through the Wikipedia article on photographic lenses, you will remember that lens openings or apertures control how much light reaches the film during exposure. Besides this function, lens openings also affect the depth of field or how much of the scene or your subject is in focus. A related topic that you should review is our lesson on conveying depth.


What is depth of field?

Simply put, “depth of field” is the distance between the nearest and farthest point from the camera that appears in focus (meaning sharp and clear). In practical terms, the depth of field extends, in terms of area, about 1/3 in front of the subject and about 2/3 behind the subject. Any object or portions of the subject below this 1/3 area and beyond this 2/3 area will appear blurred or out of focus.

Wide depth of field


A “wide depth of field” means that everything is sharp and in focus from the foreground up to the background. You need a wide depth of field in the following situations: 

(1) to convey the mood and atmosphere of your subject;
(2) for landscapes, sceneries, and interiors;
(3) for group shots;
(4) when focusing is difficult; and
(5) to give maximum visual information about your subject by bringing out the details.

Some examples of pictures with a wide depth of field


Rizal High School 1995; wide depth of field; photo by Atty. Galacio, RHS Class 1973
Rizal High School Musical Theater 1992; wide depth of field; photo by Atty. Galacio
Wide depth of field; Conveying depth through diminishing details; Rizal High School 1986 Field Demo; photo by Atty. Galacio
Wide depth of field; photo by Atty. Galacio
My cute niece Chloe and cute nephew Gino; wide depth of field; photo by their cute uncle Atty. Galacio

Shallow depth of field

On the other hand, a “shallow depth of field” means that the area of sharpness or clarity is very limited, and the background (or the near foreground) is blurred or out of focus. You need a shallow depth of field in the following situations:


(1) for portraits, so that your subject will “pop out” of the background;
(2) to hide a cluttered background;
(3) to avoid distractions or obstructions in the background or foreground;
(4) to convey depth; and
(5) to isolate certain details of the subject.

Examples of pictures with a shallow depth of field


Shallow depth of field; photo by Atty. Galacio
Rizal High School Shakespeare Festival 1993; shallow depth of field; photo by Atty. Galacio
Shallow depth of field; photo by Atty. Galacio
Again, for the purposes of the topics we will discuss below, please review the Wikipedia article on photographic lenses.

The bigger the number, the smaller the lens opening; the smaller the number, the bigger the lens opening

The SLR (single lens reflex) camera has an “iris diaphragm” which consists of crescent-shaped blades that make a circular opening in the middle of the lens and which controls the size of the aperture or the lens opening. The aperture setting ring (or simply aperture ring) in the lens controls the size of the hole made by the iris diaphragm. For example, setting the aperture ring at f/11 will reduce the size of the hole while setting it at f/4 will consequently enlarge the hole. The rule is, the bigger the number, the smaller the lens opening; the smaller the number, the bigger the lens opening.

Fully automatic diaphragm


SLR cameras have what is known as “fully automatic diaphragm.” The iris diaphragm is fully open before the shot is taken. Shortly before the shutter curtains open, the aperture will close down to the f/number you have set on the aperture ring. Why is this so? A fully automatic diaphragm provides a bright image of the subject that helps you a great deal in focusing the image correctly.  But if you use a small aperture, what could appear out of focus in the viewfinder could turn out to be in focus in the picture.


Factors that affect depth of field

Three factors affect the depth of field, namely, the lens opening, the camera to subject distance, and the focal length of your lens.


[1] Changing aperture or lens opening: If you want a wide depth of field, use a small aperture. If you like to have a narrow zone of sharpness, use a big lens opening. Small apertures like f/8, f/11, f/16 or f/22 provide a wide DOF, or enable the camera to render most of your subject sharply and clearly from foreground to back-ground. On the other hand, big or wide apertures like f/1.8, f/2 or f/4 record sharply or clearly only a very shallow or narrow plane. Remember, the DOF is proportional to the lens opening; least at wide apertures, maximum at small apertures.

[2] Changing distance: The closer a subject is to the camera, the shallower the depth of field will be. Or, the closer you are to the subject, the shallower the DOF will be.

[3] Changing the lens: If you want an image with a wide depth of field, then use lenses with short focal lengths like standard or wide angle lenses. If you want a shallow DOF, use lenses like zooms or telephotos.
Hyperfocal distance

In talking about maximizing the depth of field, professional photographers often talk about setting the lens to the “hyperfocal distance”. There’s a manual way of setting the lens to its hyperfocal distance, but some people find it a little bit confusing. But if you’re a math nerd, you can simply whip out your calculator and compute the hyperfocal distance according to this formula: H = F2 and then divided by f x 0.033; near limit of DOF = H x u divided by H + (u - F); far limit of the DOF = H x u divided by (H - F), where H is the hyperfocal distance; F= focal length of the lens; f = f/stop; and u = focused distance. Are you happy now?

Saturday, November 17, 2007

Photojournalism (36): Through the lens

Free e-book:
Creative lens techniques
How to shoot images with impact

(21 pages; 7.28 MB)
Remember the simplest definition of a camera from our lesson “I Am A Camera”? It is merely a lightproof box that holds a lens at one end and film at the other end. Some photographers go to the extreme by saying that the lens is the most important part of a camera, with the camera body merely a box to hold the film. Like most extremes, however, this view is rather, well, extreme. It can’t be denied, however, that the quality of the lens determines to a large extent the quality of a photograph.

I remember one student in the 1980’s who quite innocently asked me, “Sir, does your camera have a lens?” Well, all cameras, whether digital or film-based, have lenses, except of course, when we’re talking about the pinhole camera (the “camera obscura” of ancient history). A lens is a transparent, optical device made up of glass or high tech plastic, and is capable of “refracting” or bending light.

Most of you, at this point in time, are probably using digital cameras. Your camera thus comes with a built-in lens that allows you to shoot groups or close-ups at the touch of a button. For those of you who are joining the photojournalism competitions in the various levels of the press conferences, you are still bound by the contest rules to use film-based cameras. For the grade school level of competitions, students are allowed to use 35 mm compact, point and shoot cameras. For the high school level, however, the participants are required to use single lens reflex cameras. As we discussed before in “I Am A Camera,” SLR cameras (unlike compact, point and shoot cameras) are distinguished by an interchangeable system of lenses.

Focal length of a lens


One of the most important considerations in buying or using a lens is its focal length, which is the distance, measured in millimeters, between the optical center of the lens and the film plane when the lens is focused at infinity. 

The focal length of a lens determines two things:

(1) the magnification of the image (how big or how small the image appears), and
(2) the field of view (how much of the scene will appear in the photograph).

Don’t fall into the fallacy, however, that the longer the lens, the better your photographs will be. I remember during the 50th anniversary of the National Secondary Schools Press Conference in 1993 held in Rizal High School in Pasig, a lot of the photojournalism participants were in awe with one NCR delegate whose camera had a long, long, long, long lens. They kept saying that this delegate was definitely going to win the contest. Well, he didn’t win any place at all.

Henri Cartiér Brésson is a revered name among photographers. His goal of capturing the “decisive moment” probably best sums up what photojournalism is all about. And by deliberate choice, what kind of lens did he use? What else but the 50 mm lens or the so called standard or normal lens, which is the lens you most probably have on your single lens reflex camera right now, right? Right!

Take note of the minimum focusing distance of your lens


A note of caution. All lenses (whether for digital or film-based cameras) have their “minimum focusing distance,” which is the limit as to how close a lens can focus. This is determined by the lens design and by how far the lens can be extended by its focusing ring. With 35 mm compacts (allowed in the grade school level press conferences), the lens generally is pre-set to render in focus subjects which are around 5 feet away from the camera up to infinity. If you try to shoot something which is below the minimum focusing distance, that subject will be out of focus.

Wikipedia has excellent, easy to understand articles on the different kinds of lenses, and on apertures and lens openings. Please browse these articles before proceeding with this lesson on lenses, okay?

Versatility of a zoom lens

I shot the following pictures using my beloved Canon AE-1 Program camera and my Vivitar f/3.5~5.6, 28-210 mm zoom lens. A zoom lens is two or three lenses rolled into one. With this zoom lens, I was able to shoot wide angle shots of groups, and telephoto (meaning, magnified) shots of faraway subjects.


With the pictures above, I used the 28 mm (wide angle) end of my zoom lens. Without having to move back, I was able to include almost the whole athletic oval where hundreds of students were performing for the Field Demonstration. Now take a look at the next picture.

I then zoomed in on the students at the center of the athletic oval, using the 210 mm (telephoto end) of my zoom lens. I didn’t move from the position I was in when I took the 2nd wide angle shot above, but my zoom lens allowed me to shoot a close-up of the group of students performing in the middle of the oval.

The pictures below illustrate the versatility of a zoom lens, that is, from wide angle shots, I was able to shoot close-ups of my subjects.


Telephoto lenses compress linear perspective

(Note: To be technically accurate about it, it is not the focal length of the lens but the camera-to-subject distance that produces the compressed or stacked perspective.)

Telephoto lenses appear to compress linear perspective, that is, background details seem to move toward you, and objects that in reality are far apart look or appear much closer than they really are. If you watch any sports event, for example, on television, the spectators in the background look deceivingly much closer to the players in the foreground. This effect is known as “stacked perspective”, “compressed” perspective or “squashed” perspective.


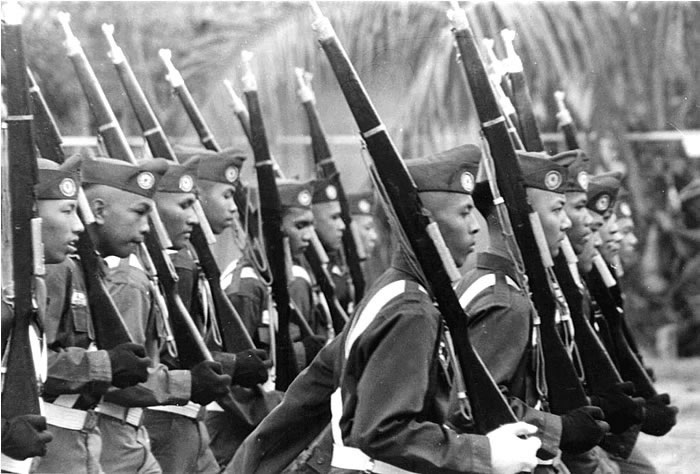
Take the picture above of the marching cadets, for example. We all know how wide a platoon is, with nine cadets (or elements) in each squad. Notice, however, that the cadets seem so close to each other, like they were squashed together in a single shallow plane. Like I said, this effect is known as “compressed perspective” among other names. (Pssst, guys, check your alignment!)


The picture above is another example of compressed perspective. An airplane seems just about to crash towards the church tower. (Memories of 911!) The plane and tower are really far apart, but the telephoto end of my zoom lens produced this compressed perspective.

Wide angle lenses, distortion, and the keystoning effect


When you want a great depth of field, that is, everything in the picture must be recorded sharply, from foreground to deep background, you have to use a wide angle lens. Pictures shot with a wide angle lens have a strong sense of depth and distance.

On the other hand, the most significant disadvantage of wide angle lenses is distortion. If there are circular objects at the corners of the frame, they become distorted, taking on oval shapes. If you’re shooting crowd scenes for example, heads of persons near the frame corners will become distorted. Wide angle lenses are thus not suited for close up portraits.

Also, if you tilt the camera even a little upward, parallel vertical lines of the subject (like those of the building above) will converge towards the top or bottom of the picture. This is the so-called “keystoning” effect.

Trivia on lenses


1. Bill Foley won the 1983 Pulitzer Prize, the most prestigious prize in journalism, for his photo coverage of the Sabra and Shattila massacres in Lebanon where Christian militiamen murdered Palestinian civilians in these two refugee camps.

One time, Foley and Time photographer Bill Pierce were picked up at a checkpoint manned by Syrian soldiers who suspected them of being spies for the Israeli army which had invaded Lebanon. They were detained and beaten up.

Foley had a handheld light meter which naturally had the various f-numbers/apertures indicated on its exterior. One of the Syrian soldiers manning the checkpoint was convinced that the “f/16” marking on Foley’s meter was a means for communicating with Israeli F-16 fighter jets!

2. Distortions and converging lines created by wide angle lenses are generally treated as liabilities but as you master the basics of photography, you will learn to use these liabilities creatively in order to come up with better pictures.

3. So you’re stuck with your dinky standard lens, with no money to buy those monster zoom or telephoto lenses you see professional photographers carry around ... You wonder how in the world you can ever improve your skills without those long lenses. Well, what lens did Hénri Cartiér Brésson or Eduard Masferré (a Belgian photographer whose pictures of the Ifugaos and other mountain tribesmen may be considered as national treasures) use? What else but the very same dinky standard lens you have!

4. “Perfect Strangers” was a very popular television sitcom in the 1980’s and early 1990’s. The show told the stories of Balki, an innocent, naive immigrant to the US and his cousin Larry, a struggling photojournalist who never seemed to run out of troubles primarily because of his insecurities, get rich quick schemes and his bloated ego.

But Balki would always come to Larry’s rescue, and Larry would always see the error of his ways. While we felt good about Balki’s innocence, we also readily identified with Larry’s insecurities, his foibles and his failures.

In one episode, Balki and Larry went to a photo exhibit by a renowned photographer. Larry wanted to meet the photographer whom he thought could help him in his career as a photojournalist but the highbrow hosts of the exhibit didn’t give him the chance.

Depressed, Larry began criticizing the photographs, especially that of a solitary man along a highway. Larry said that the photographer should have used a 24 mm wide angle lens instead of a 28 mm lens. Or was it a 20 mm lens instead of a 24 mm? Anyway, the host of the exhibit who overheard these remarks promptly and publicly scolded Larry for daring to criticize the photograph.

While Larry was stammering his way towards an explanation, the world famous photographer asked him why a 24 mm lens should have been used. Larry answered, quite correctly as the photographer would later on say, that a 24 mm lens would dramatically “increase the photograph’s sense of isolation.”

Just for once, Larry was right, and we all felt, I’m sure, really, really good about Larry’s vindication.